> For the complete documentation index, see [llms.txt](https://guardian.hedera.com/llms.txt). Markdown versions of documentation pages are available by appending `.md` to page URLs; this page is available as [Markdown](https://guardian.hedera.com/guardian/workspace/decentralized-guardian/connecting-your-mgs-instance-with-verra/step-by-step-walkthrough.md).
# Step-by-Step Walkthrough
### 1. Publish the policy publicly (Main instance)
1. Log in to the main instance as the standard registry that owns the policy.
2. Open **Manage Policies** and install the policy through the **Local Policies** tab.
3. Start the publish action on the policy row to open the **Publish Policy** dialog.
4. Set **Availability** to **Public**. This is what allows users from other instances to request access and submit projects to this methodology. A policy published as **Private** cannot be used in a decentralized manner.
5. Enter a version number and click Publish.
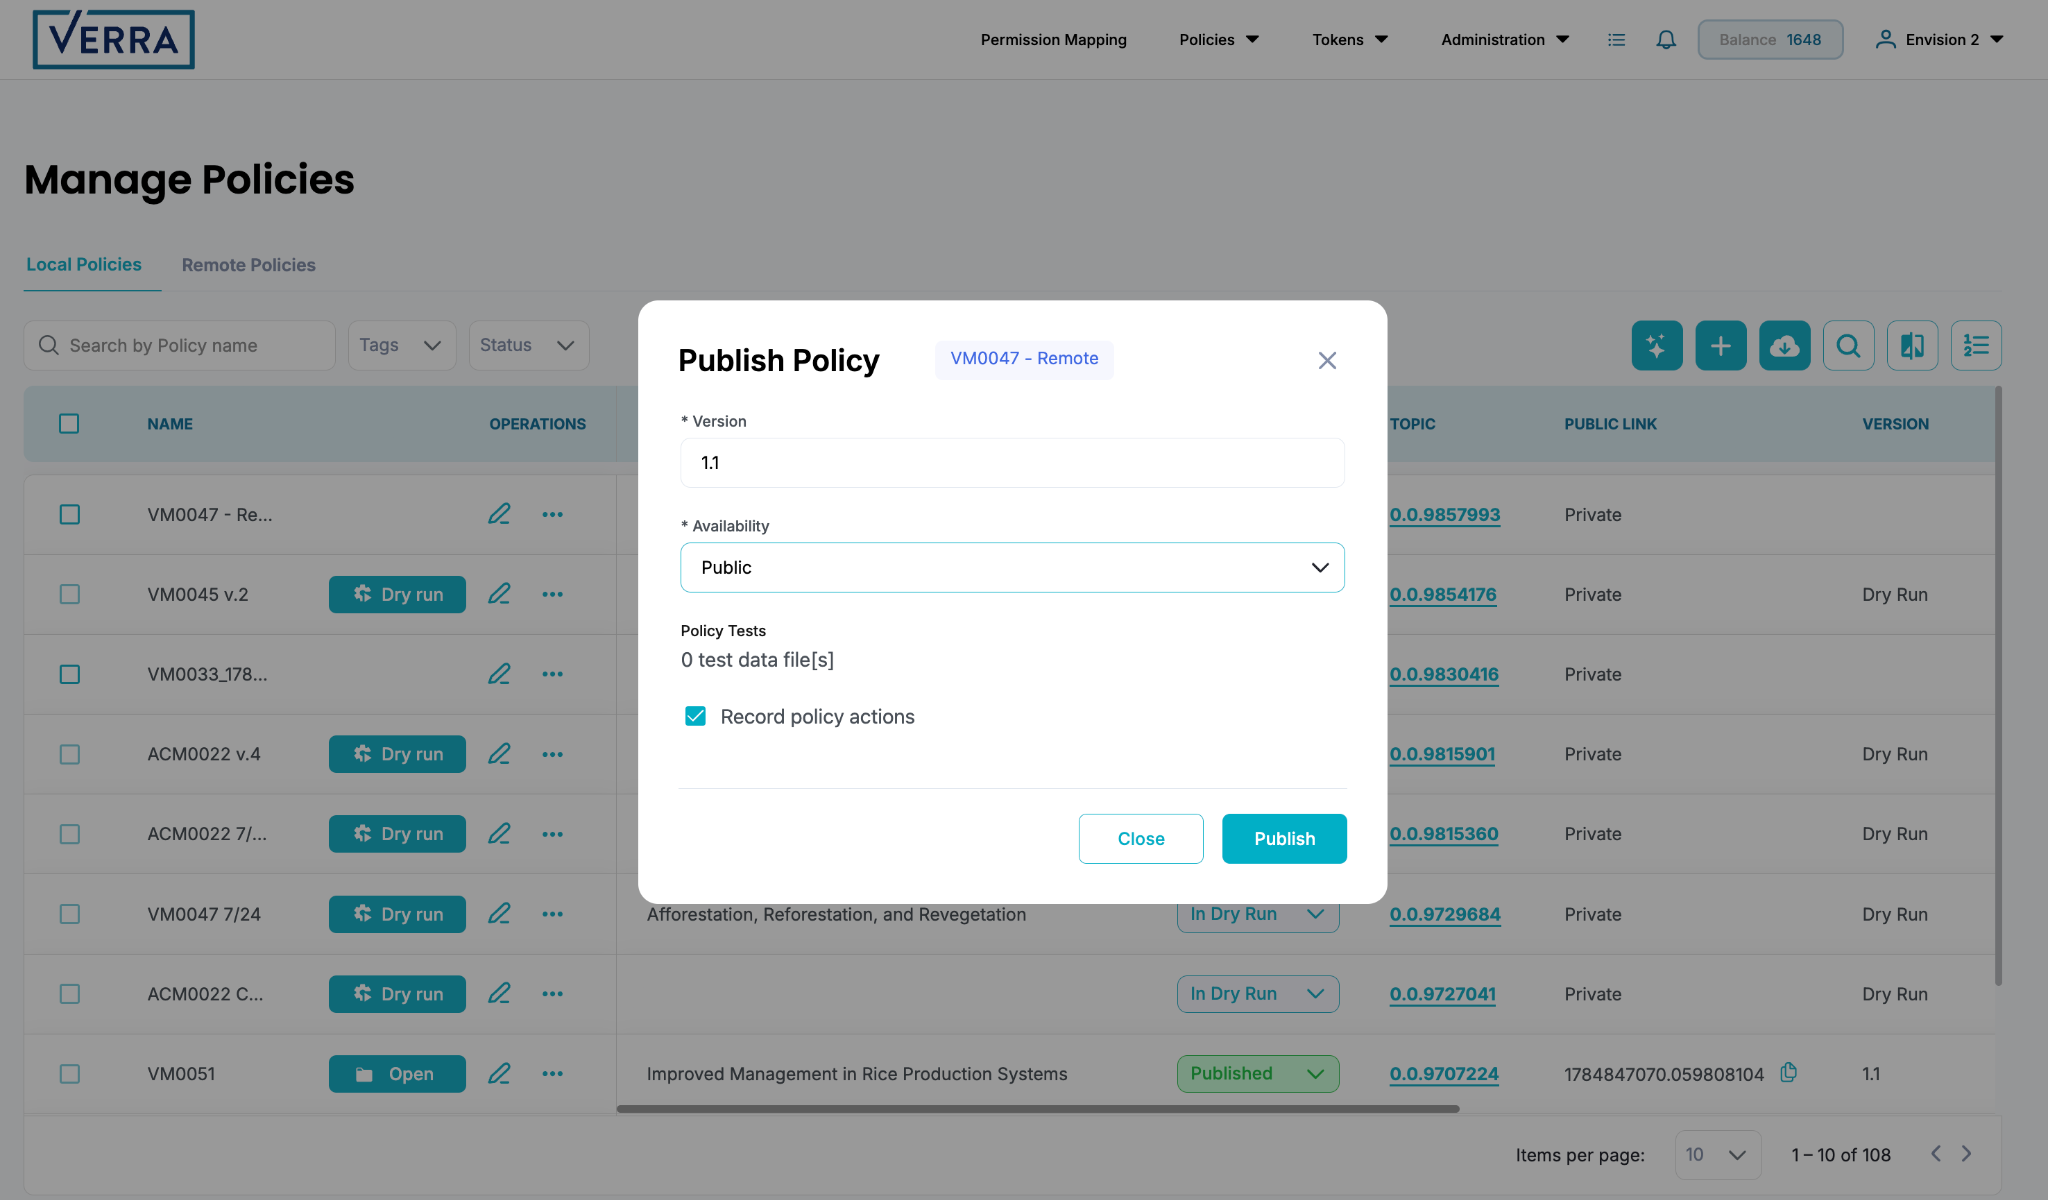 *Figure 1. The Publish Policy dialog. Availability must be set to Public.*
{% hint style="info" %}
Note: Publishing takes some processing time. Wait for the policy status to change to Published before continuing.
{% endhint %}
### 2. Copy the public link (Main instance)
1. Back on **Manage Policies**, the published policy row now shows a **Public Link** column containing the policy message ID (for example, **1785511586.942929104**).
2. Click the copy icon next to the public link.
3. Share the link with the project developers in the other instances who want to use the methodology.
*Figure 1. The Publish Policy dialog. Availability must be set to Public.*
{% hint style="info" %}
Note: Publishing takes some processing time. Wait for the policy status to change to Published before continuing.
{% endhint %}
### 2. Copy the public link (Main instance)
1. Back on **Manage Policies**, the published policy row now shows a **Public Link** column containing the policy message ID (for example, **1785511586.942929104**).
2. Click the copy icon next to the public link.
3. Share the link with the project developers in the other instances who want to use the methodology.
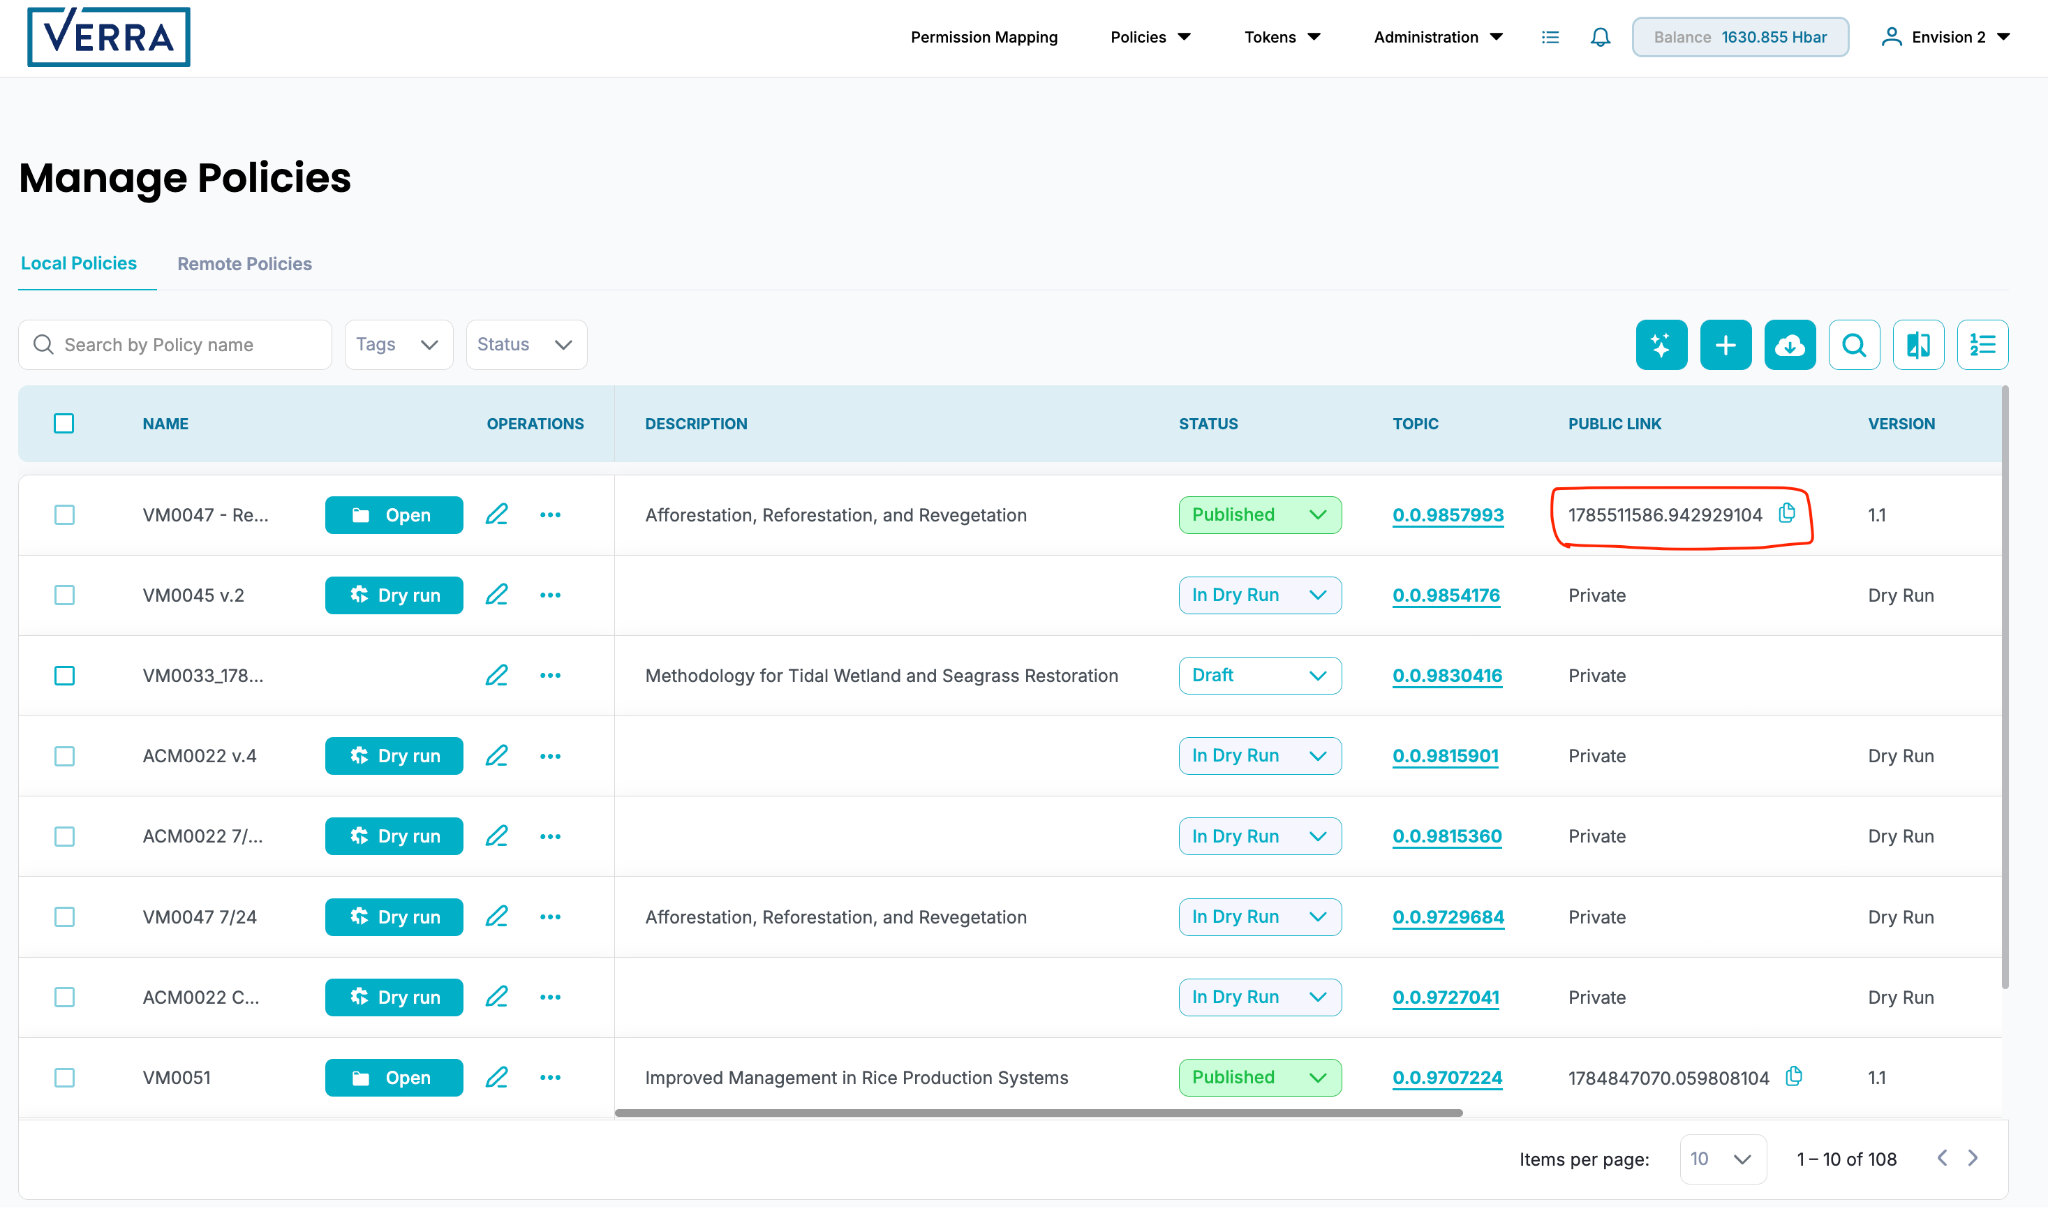 *Figure 2: After publishing, copy the policy's public link from the Manage Policies screen.*
### 3. Request access to the policy (Dependent instance)
1. Using another Guardian instance, log in as a **local user** (i.e., **project developer**).
2. Go to **Policies**, then **Remote Policies**.
3. Click **Request Remote Policy**.
4. Paste the **public link** into the **Message timestamp** field.
*Figure 2: After publishing, copy the policy's public link from the Manage Policies screen.*
### 3. Request access to the policy (Dependent instance)
1. Using another Guardian instance, log in as a **local user** (i.e., **project developer**).
2. Go to **Policies**, then **Remote Policies**.
3. Click **Request Remote Policy**.
4. Paste the **public link** into the **Message timestamp** field.
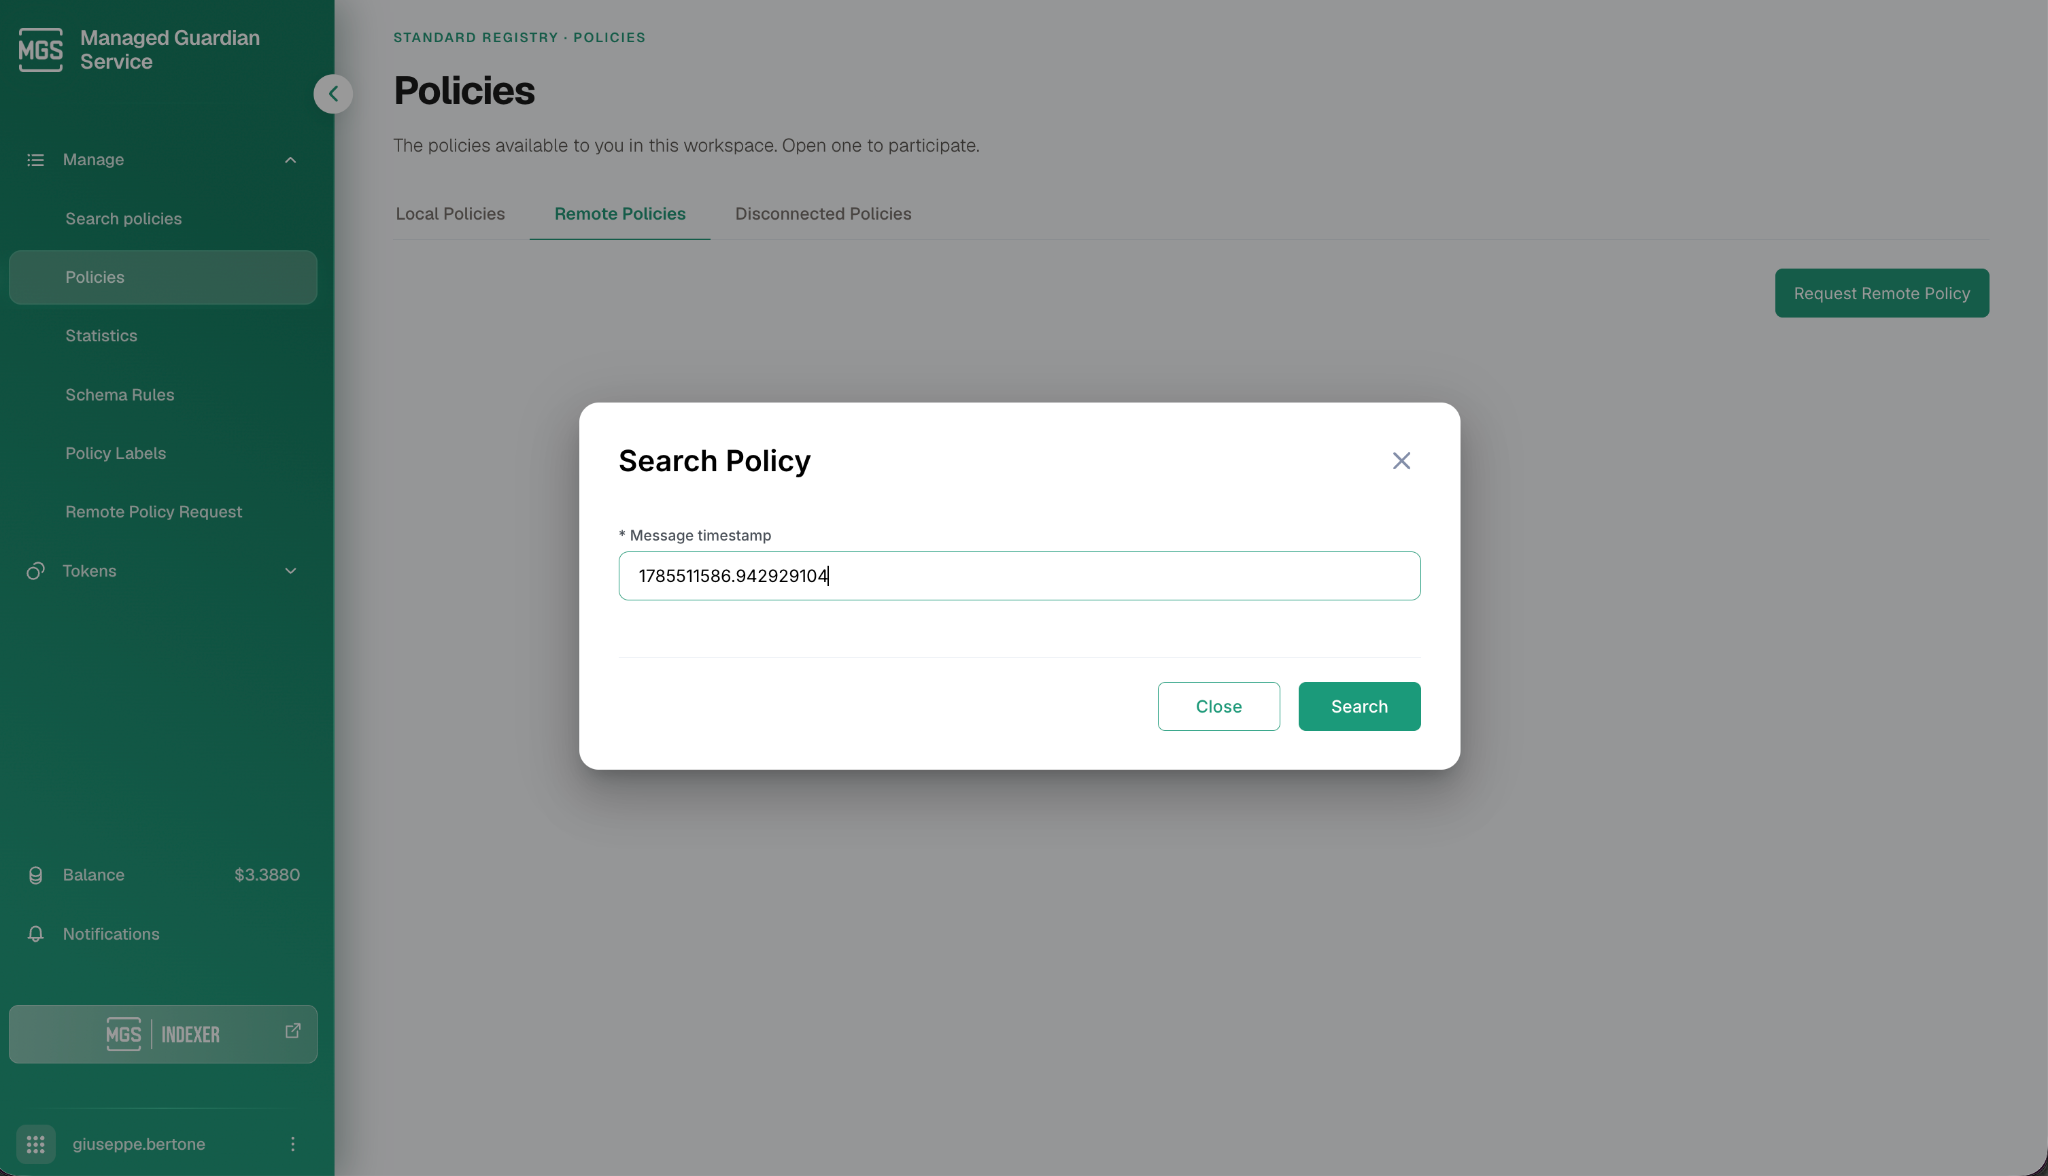 *Figure 3. Paste the public link into the Search Policy dialog.*
5. Review the preview of the policy, which shows its name, description, version, and type. Confirm the request with the **Import** button.
*Figure 3. Paste the public link into the Search Policy dialog.*
5. Review the preview of the policy, which shows its name, description, version, and type. Confirm the request with the **Import** button.
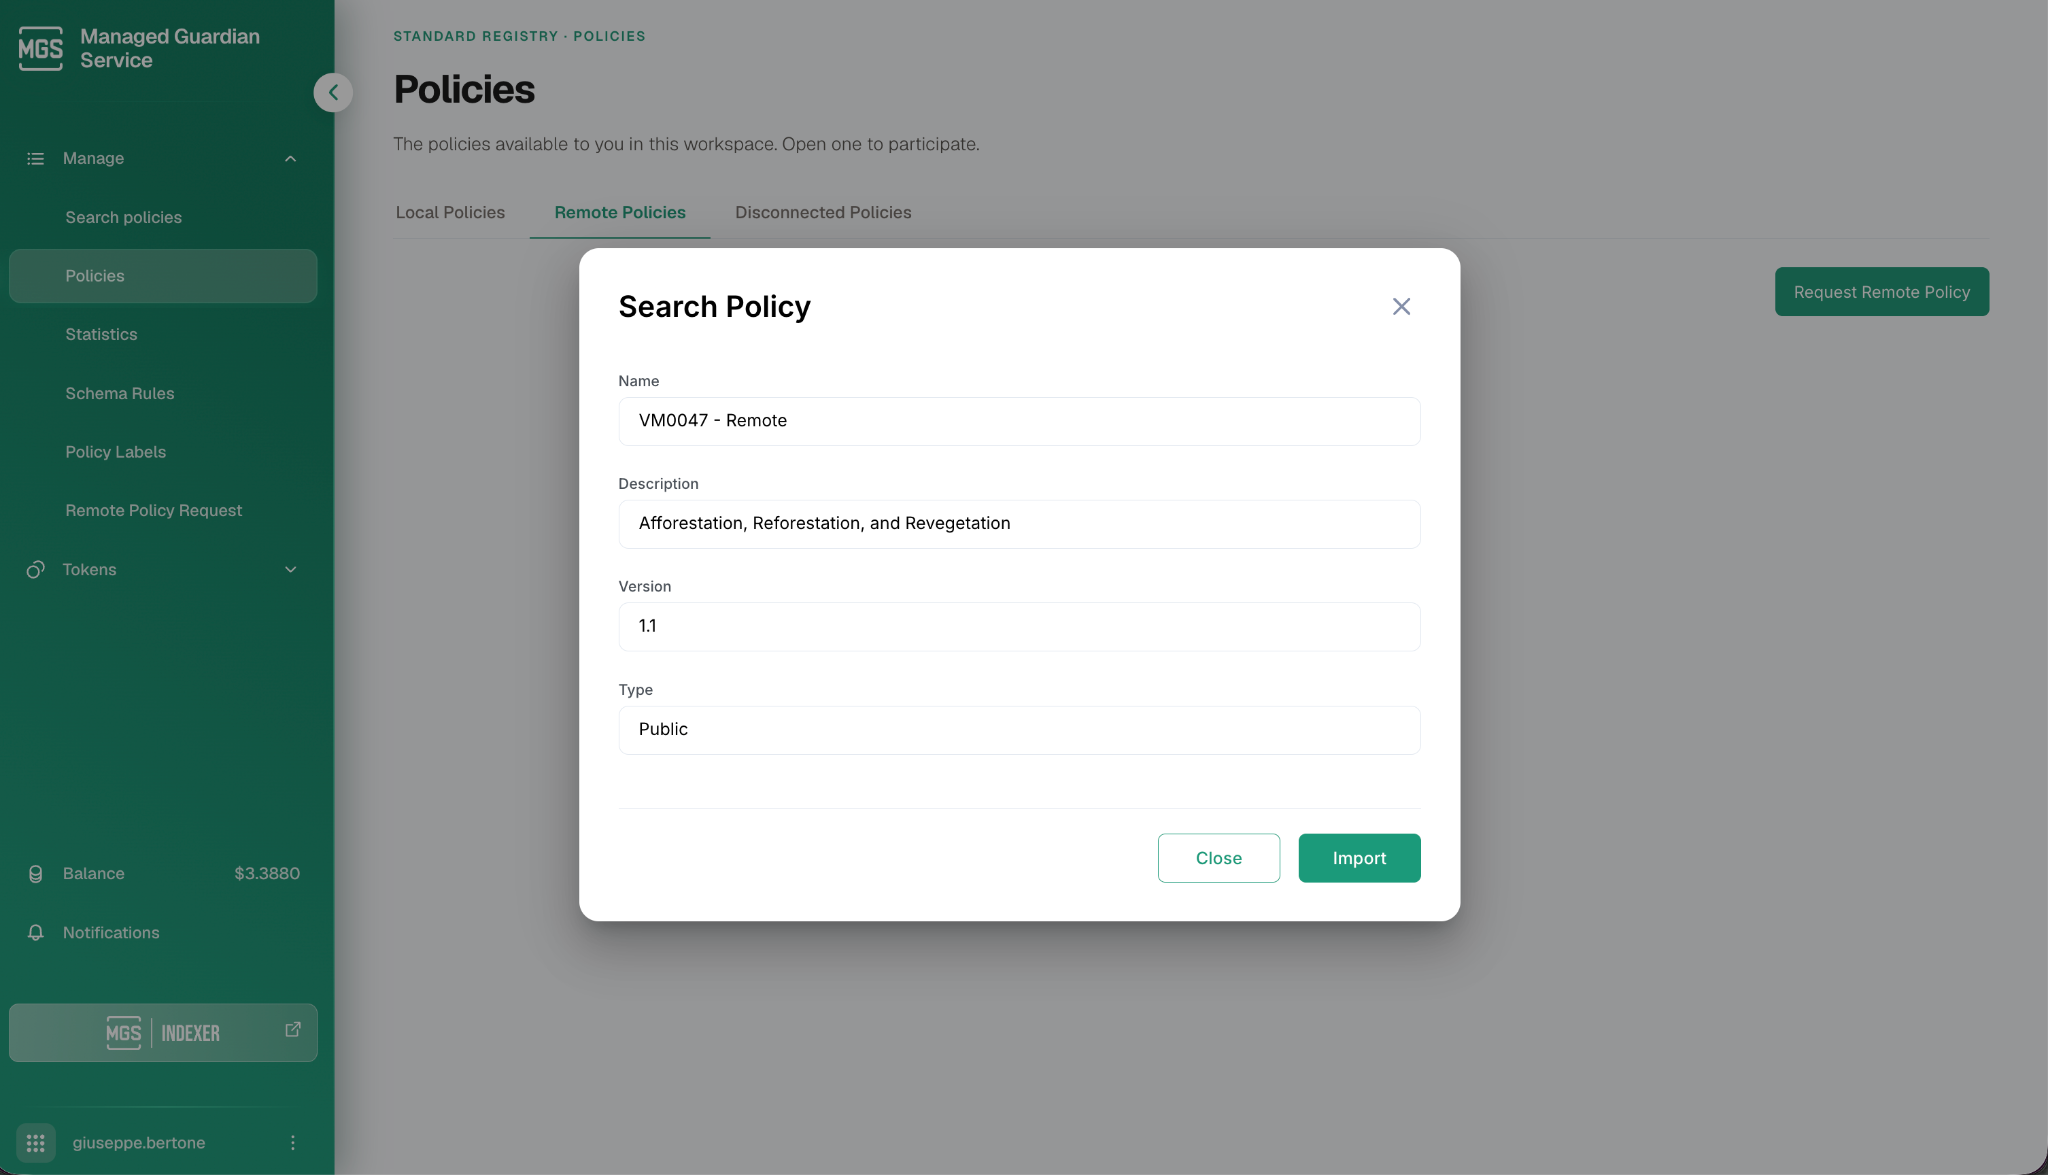 *Figure 3. A few details of the methodology are shown before the request is submitted.*
6. The policy is imported with the status **New**. It cannot be used yet; the standard registry of this instance must approve the import first. This is needed only once, and after that, all subsequent users that require access will be added automatically to the remote policy in the local instance. The remote user in the main instance must still be given access to the policy before being able to operate on it.
*Figure 3. A few details of the methodology are shown before the request is submitted.*
6. The policy is imported with the status **New**. It cannot be used yet; the standard registry of this instance must approve the import first. This is needed only once, and after that, all subsequent users that require access will be added automatically to the remote policy in the local instance. The remote user in the main instance must still be given access to the policy before being able to operate on it.
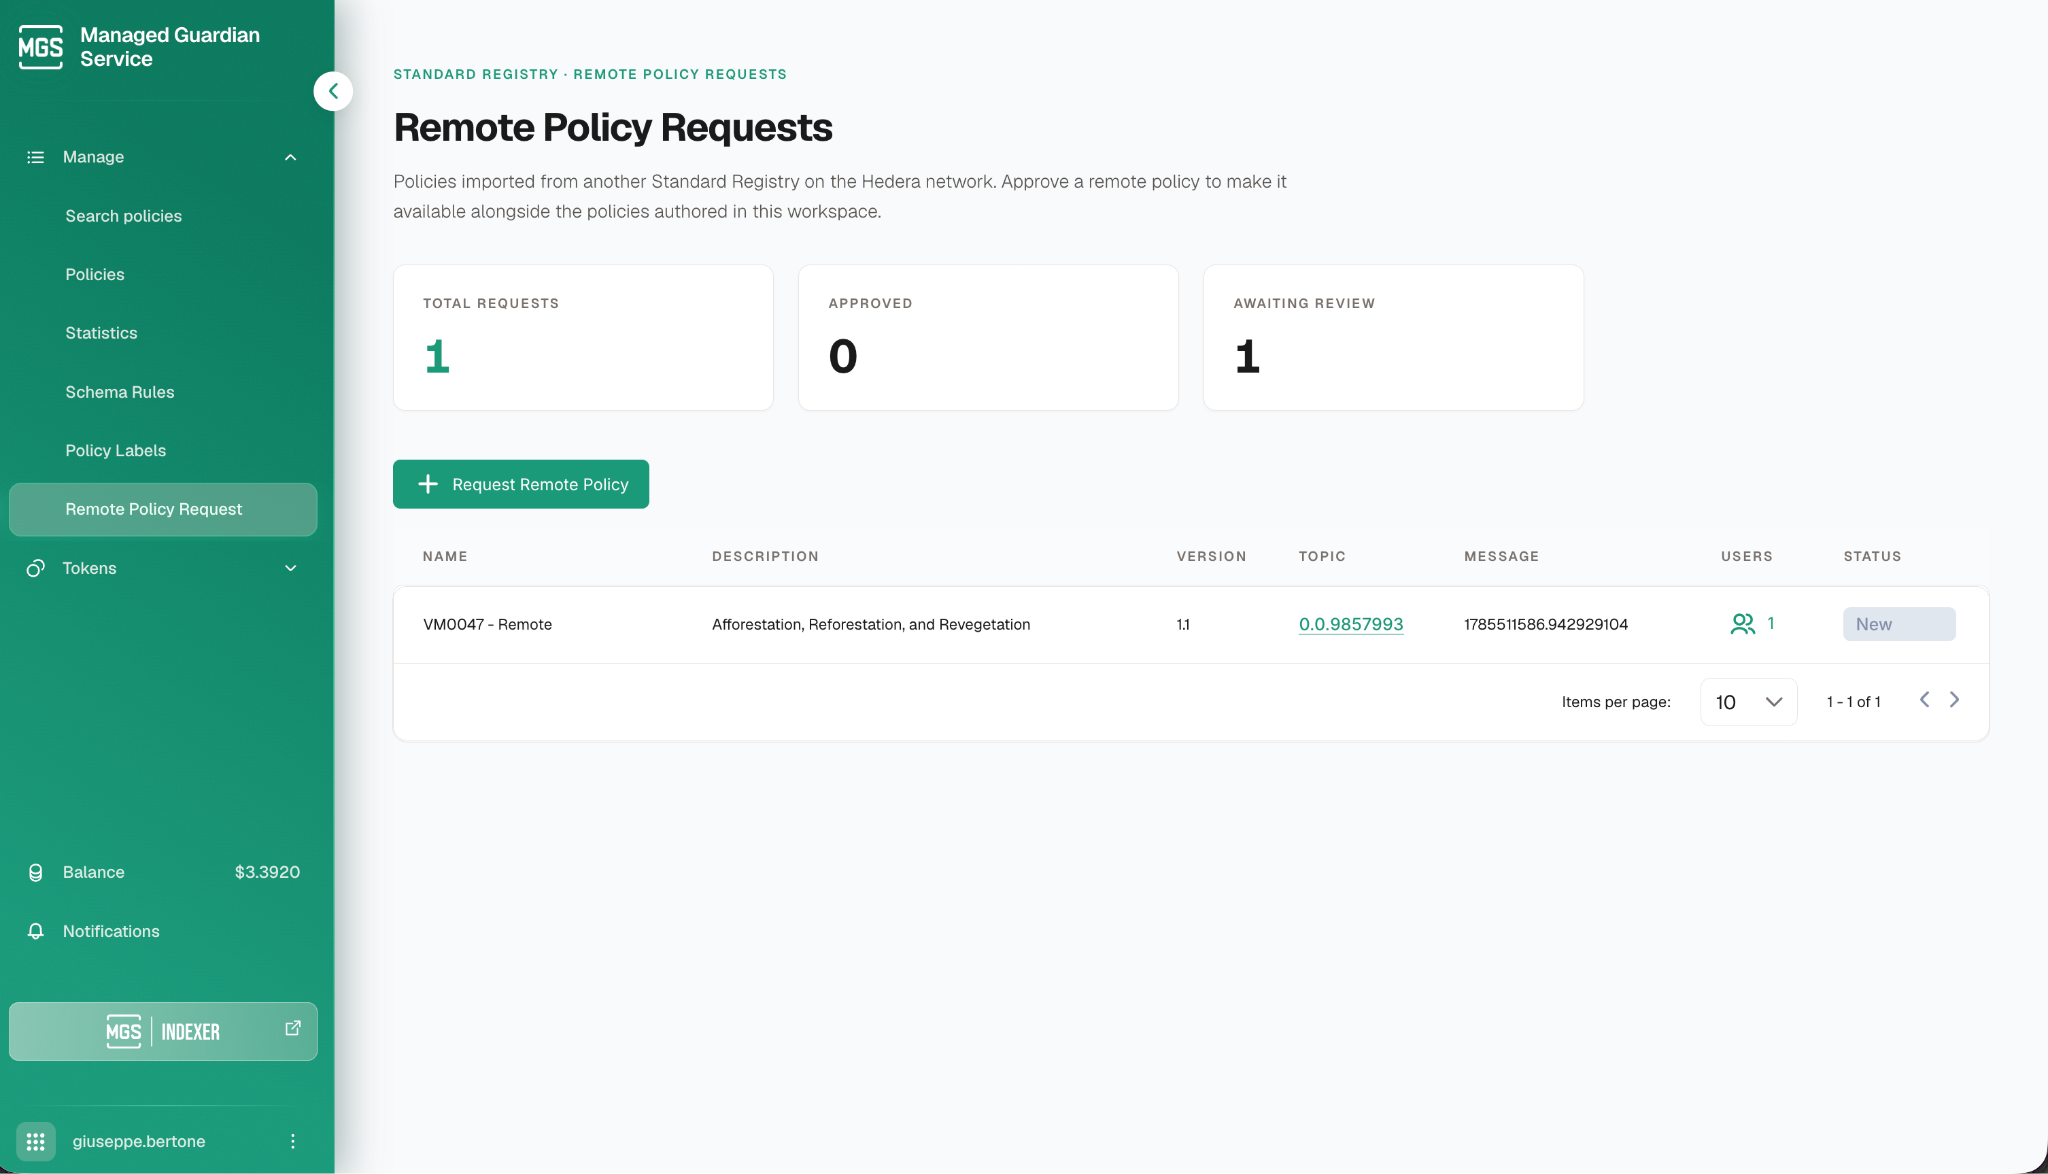 *Figure 4. The imported policy appears with the status New.*
### 4. Approve the import request (Dependent instance)
1. Log out and log back in as the **standard registry** of the **dependent instance**.
2. Go to **Policies**, then **Remote Policy Requests**.
3. The requested policy appears with its version, topic, and public link, along with **Approve** and **Reject** options. Click **Approve**.
*Figure 4. The imported policy appears with the status New.*
### 4. Approve the import request (Dependent instance)
1. Log out and log back in as the **standard registry** of the **dependent instance**.
2. Go to **Policies**, then **Remote Policy Requests**.
3. The requested policy appears with its version, topic, and public link, along with **Approve** and **Reject** options. Click **Approve**.
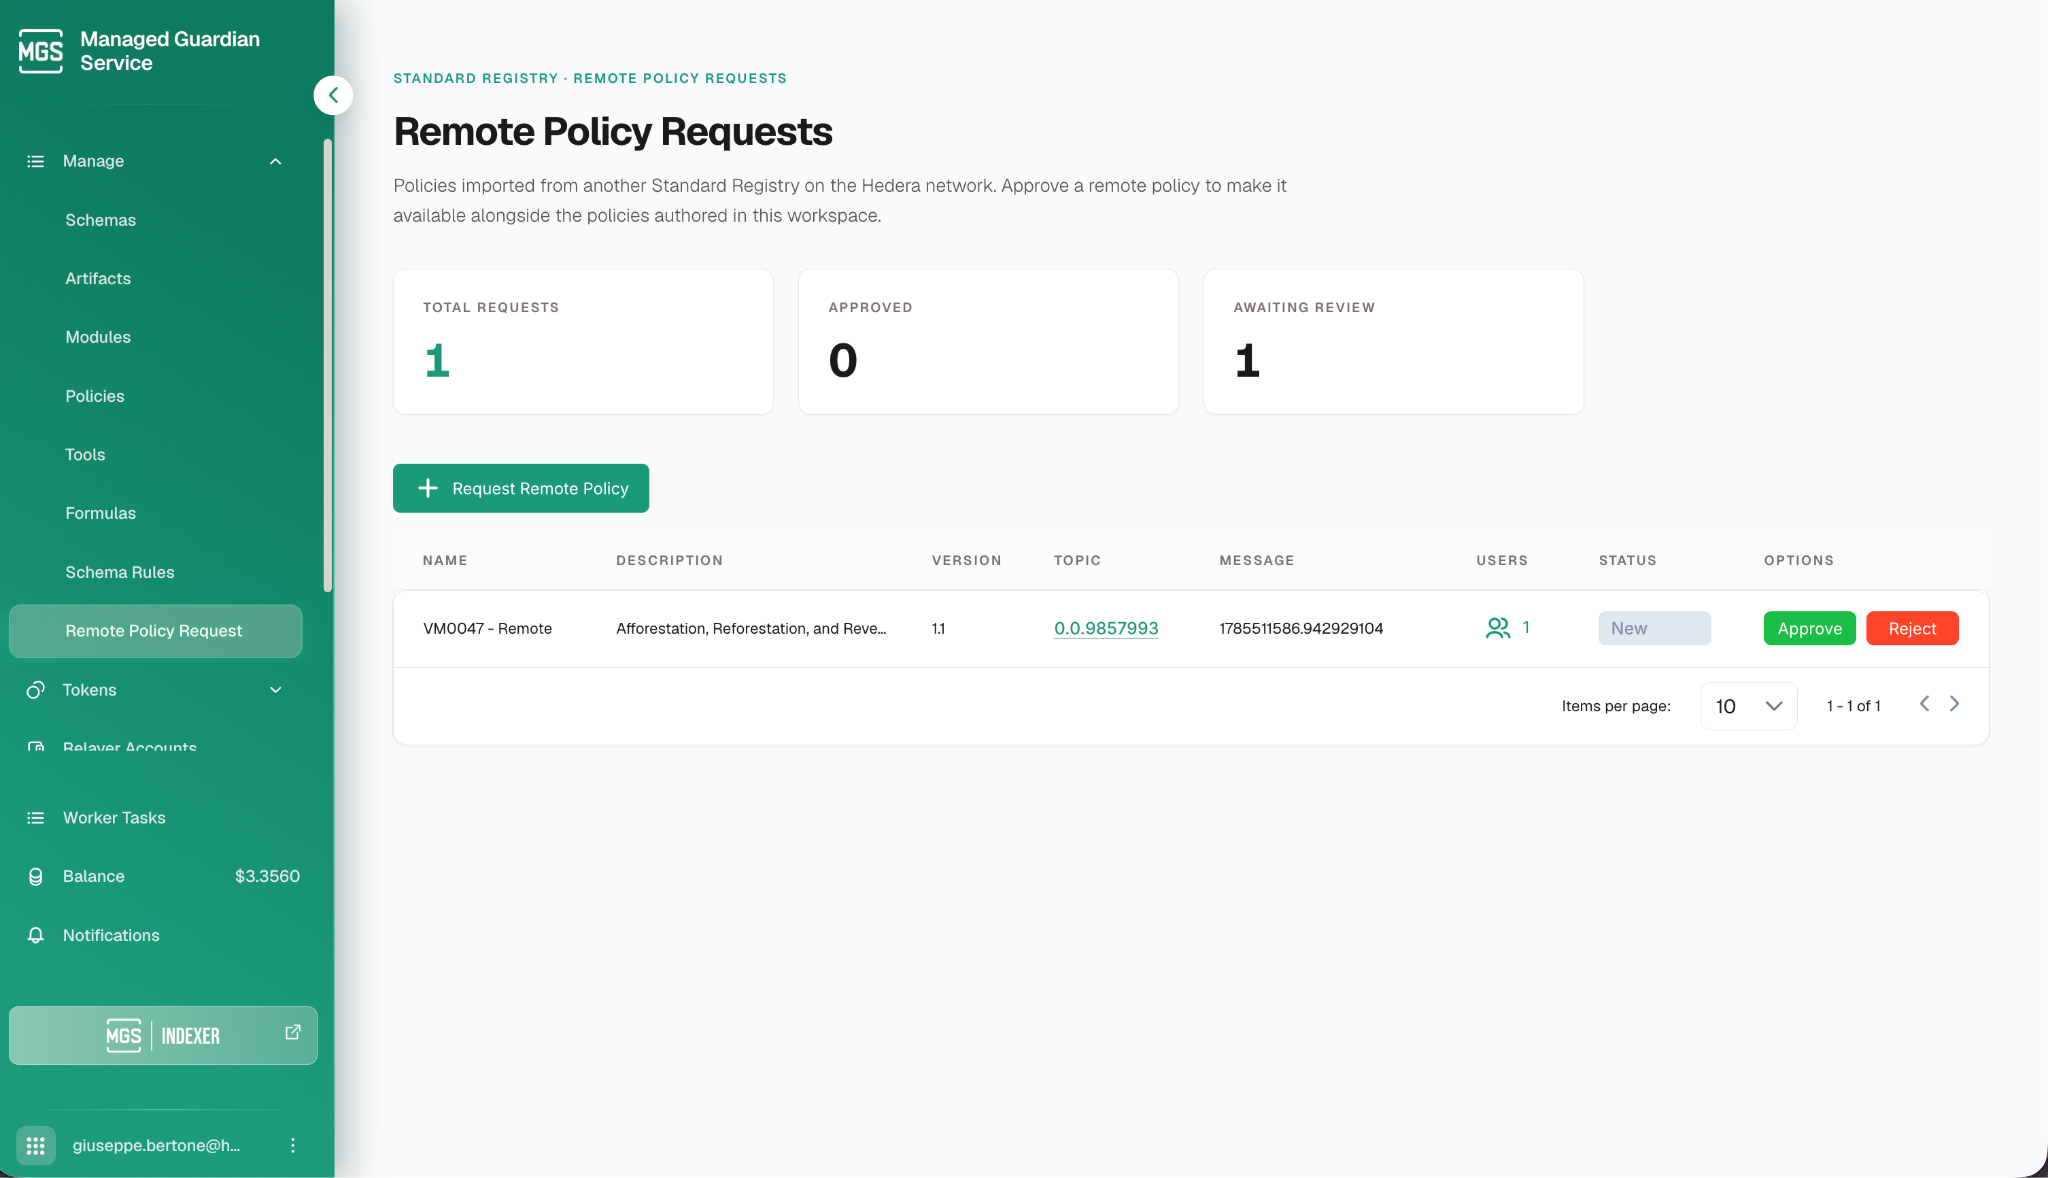 *Figure 5. The dependent standard registry approves or rejects the imported policy.*
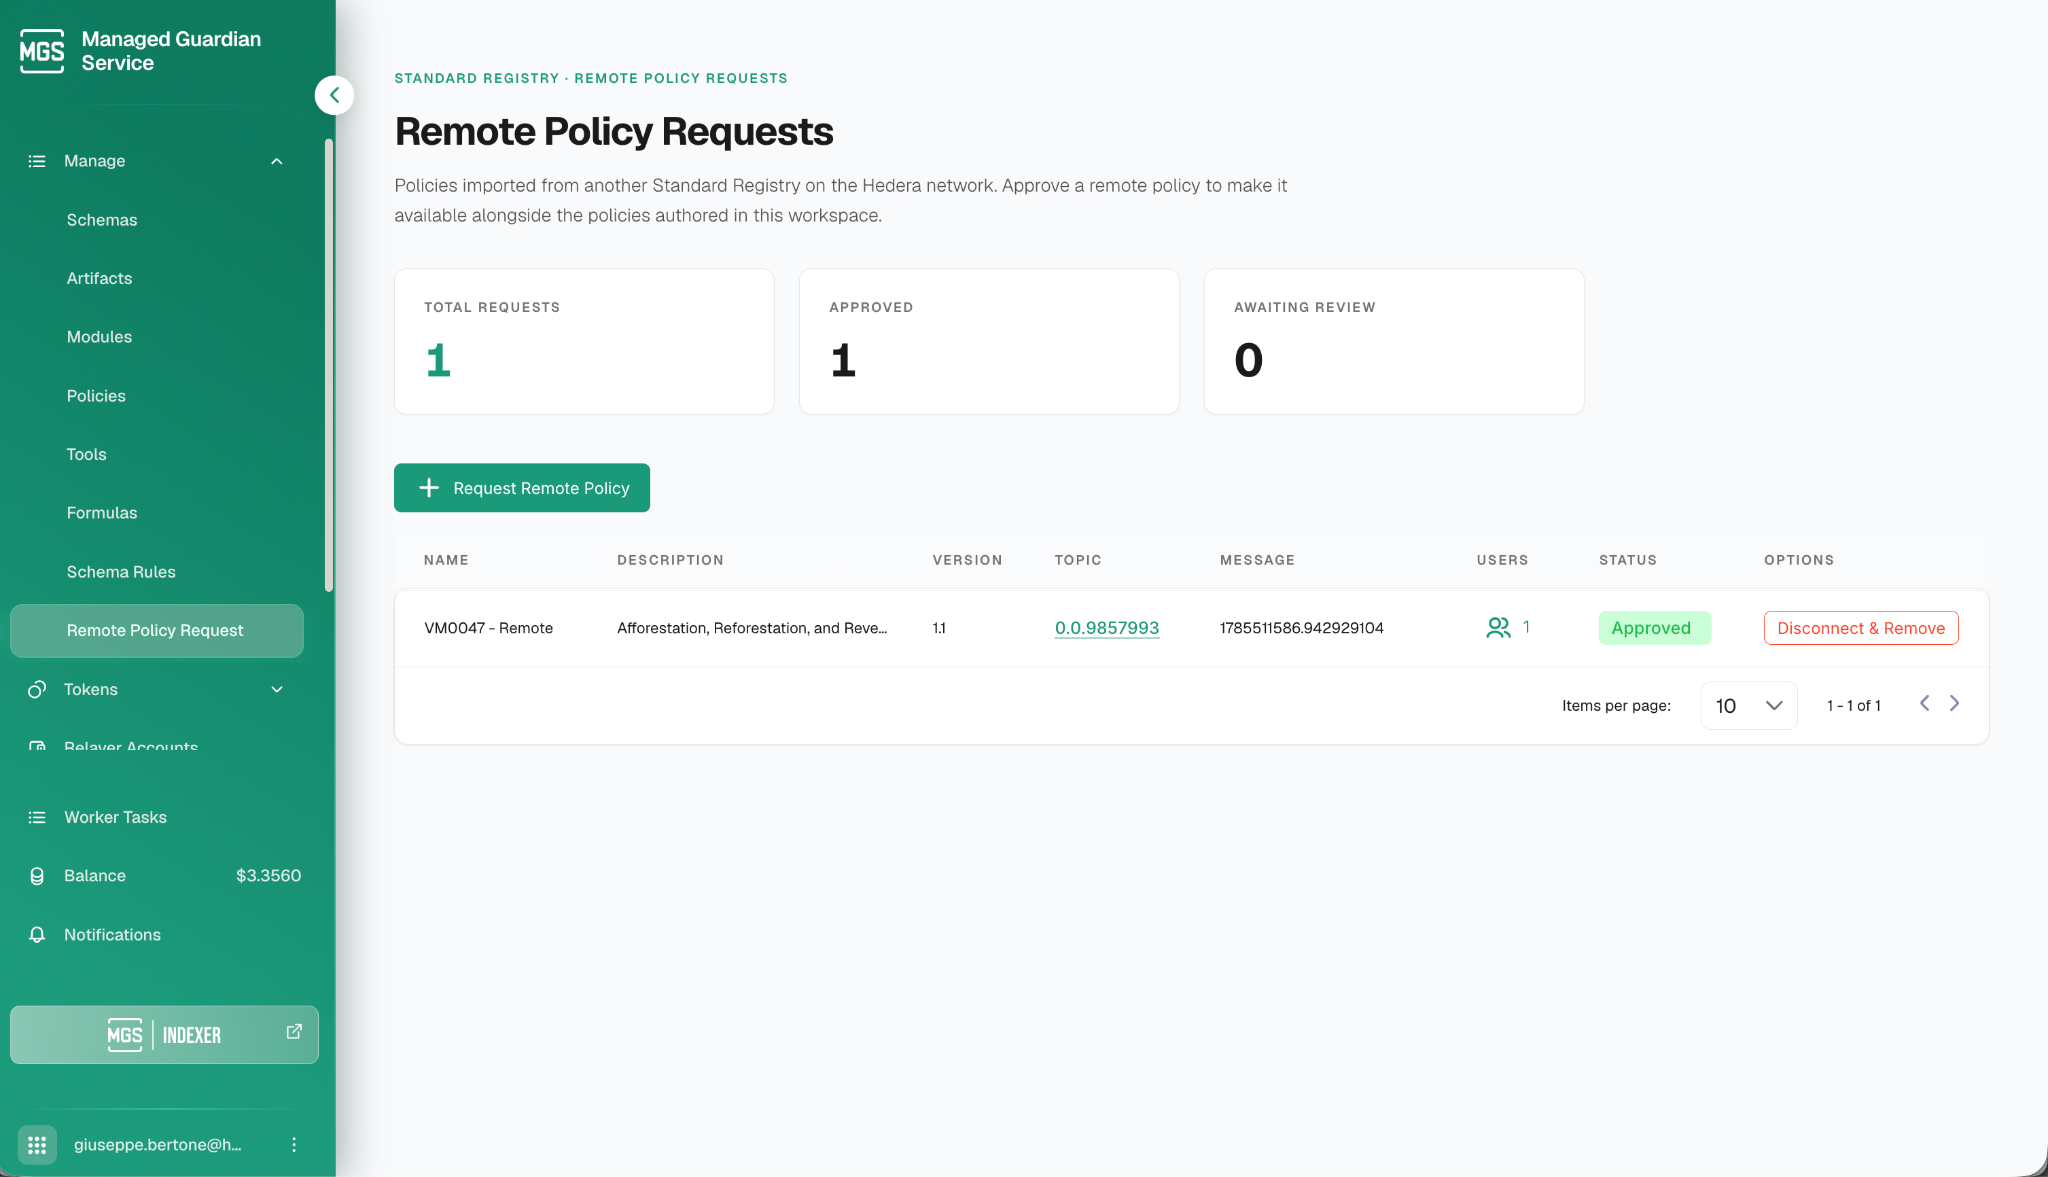 *Figure 6. The remote policy request has been approved and it already includes the initial user requesting the import.*
{% hint style="info" %}
Note: The dependent standard registry still has to approve the policy import before any user can use it.
{% endhint %}
### 5. Download the dependent user profile (Dependent instance)
1. Log back in as the **local user** (i.e., project developer).
2. Open the **Profile** page.
3. Click **Download profile**. This creates a **.user file** (for example, dependentuser.user) and saves it to your downloads folder.
This file carries the dependent user's identity to be installed as a remote user in the main instance, so the main instance standard registry can grant permissions to it for the policy.
*Figure 6. The remote policy request has been approved and it already includes the initial user requesting the import.*
{% hint style="info" %}
Note: The dependent standard registry still has to approve the policy import before any user can use it.
{% endhint %}
### 5. Download the dependent user profile (Dependent instance)
1. Log back in as the **local user** (i.e., project developer).
2. Open the **Profile** page.
3. Click **Download profile**. This creates a **.user file** (for example, dependentuser.user) and saves it to your downloads folder.
This file carries the dependent user's identity to be installed as a remote user in the main instance, so the main instance standard registry can grant permissions to it for the policy.
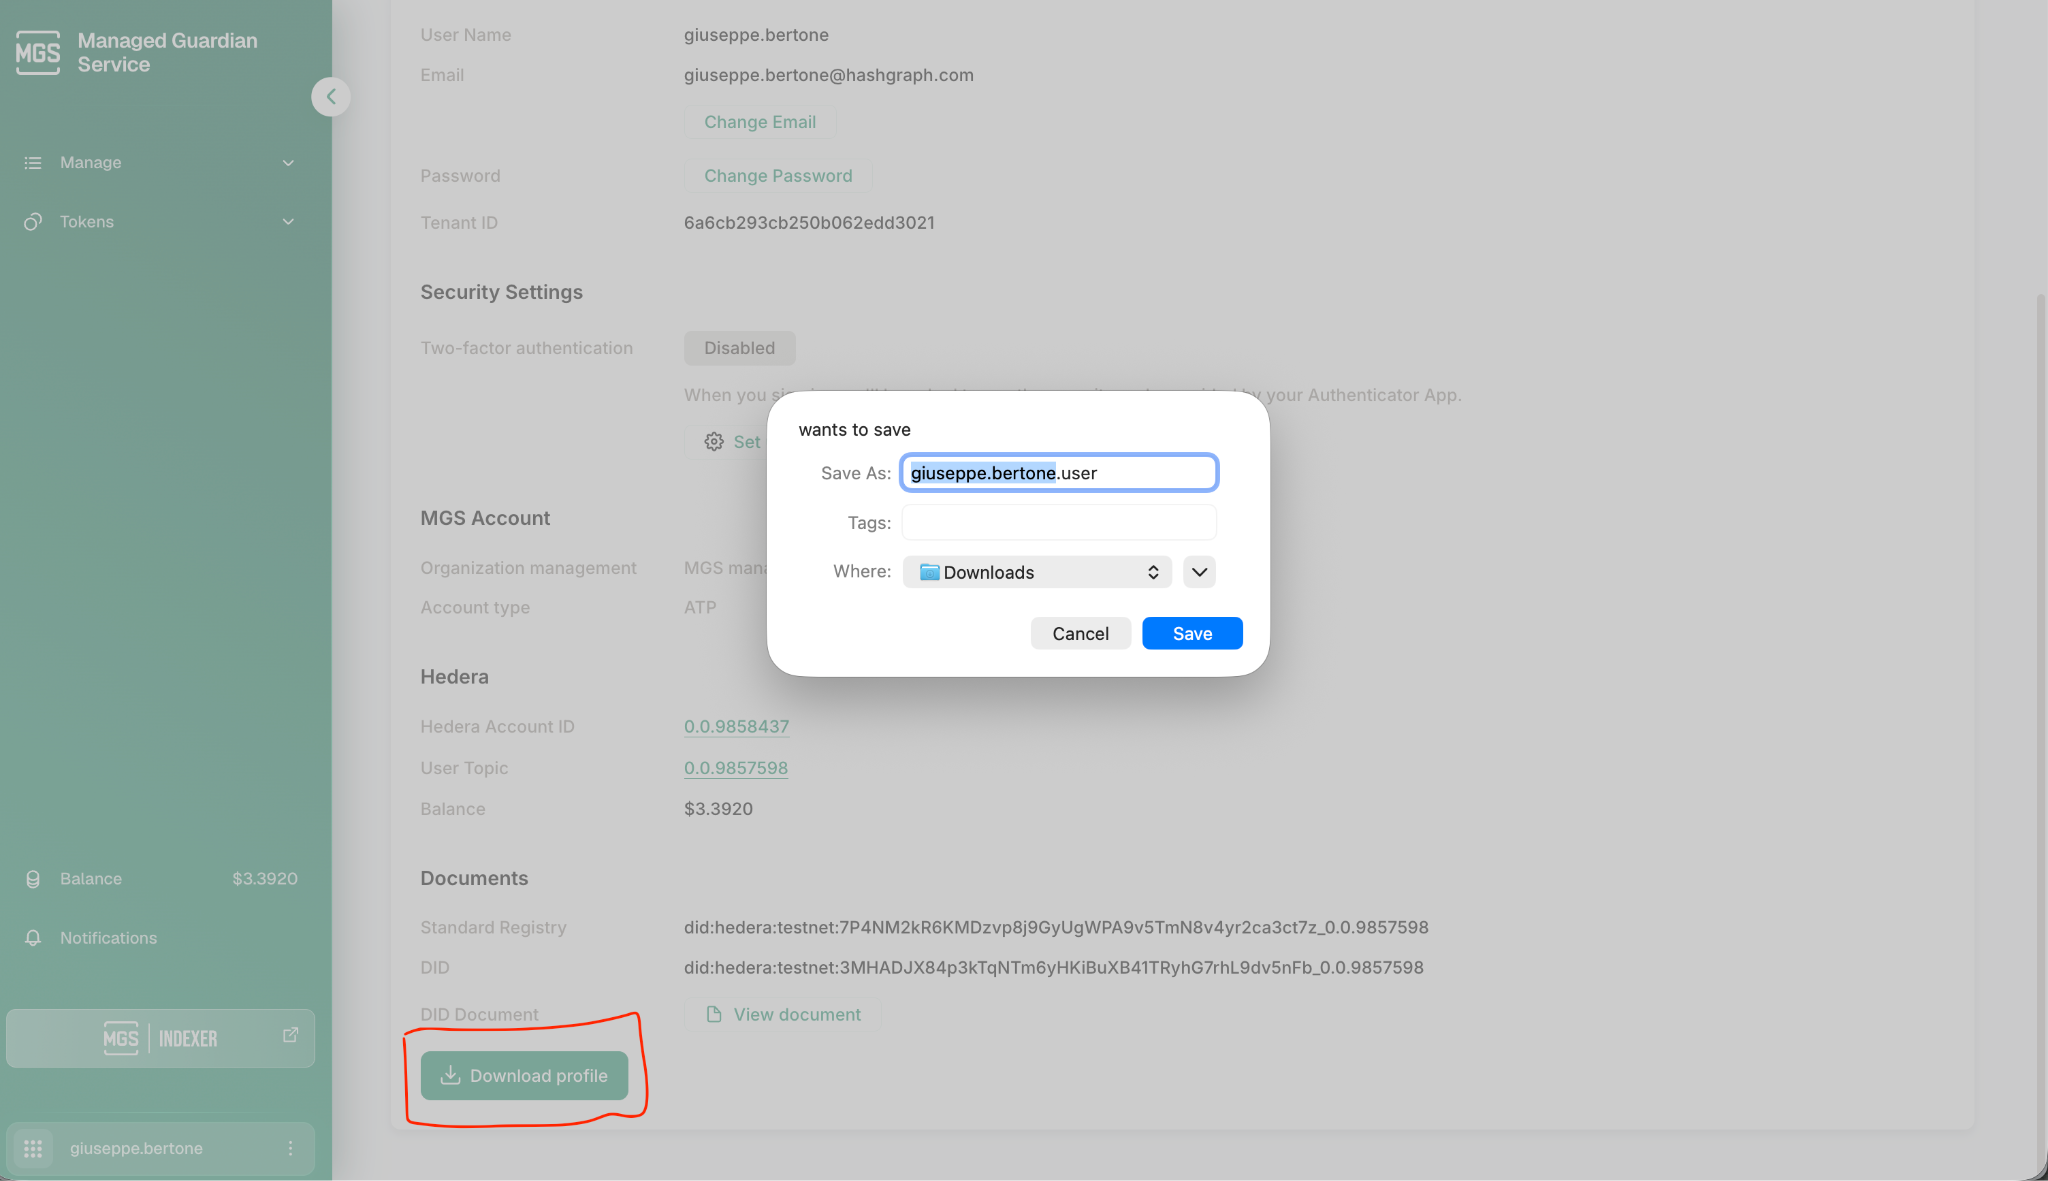 *Figure 7. Download the dependent user's profile as a .user file.*
### 6. Invite the remote user (Main instance)
1. Switch to the **main instance** and log in with **administrator access**.
2. Open the **user management** page and click **Send Invite**. Enter an email address for the new user, keep the role as **User**, and assign it to the **main instance standard registry**.
### 7. Create the remote user (Dependent user using the main instance)
1. **Accept the invitation** and begin the **User Profile Setup**.
2. **Skip the vault step**.
3. In the Hedera Account section, **do not enter Hedera details manually**. Instead, **upload the .user file** downloaded from the dependent instance.
*Figure 7. Download the dependent user's profile as a .user file.*
### 6. Invite the remote user (Main instance)
1. Switch to the **main instance** and log in with **administrator access**.
2. Open the **user management** page and click **Send Invite**. Enter an email address for the new user, keep the role as **User**, and assign it to the **main instance standard registry**.
### 7. Create the remote user (Dependent user using the main instance)
1. **Accept the invitation** and begin the **User Profile Setup**.
2. **Skip the vault step**.
3. In the Hedera Account section, **do not enter Hedera details manually**. Instead, **upload the .user file** downloaded from the dependent instance.
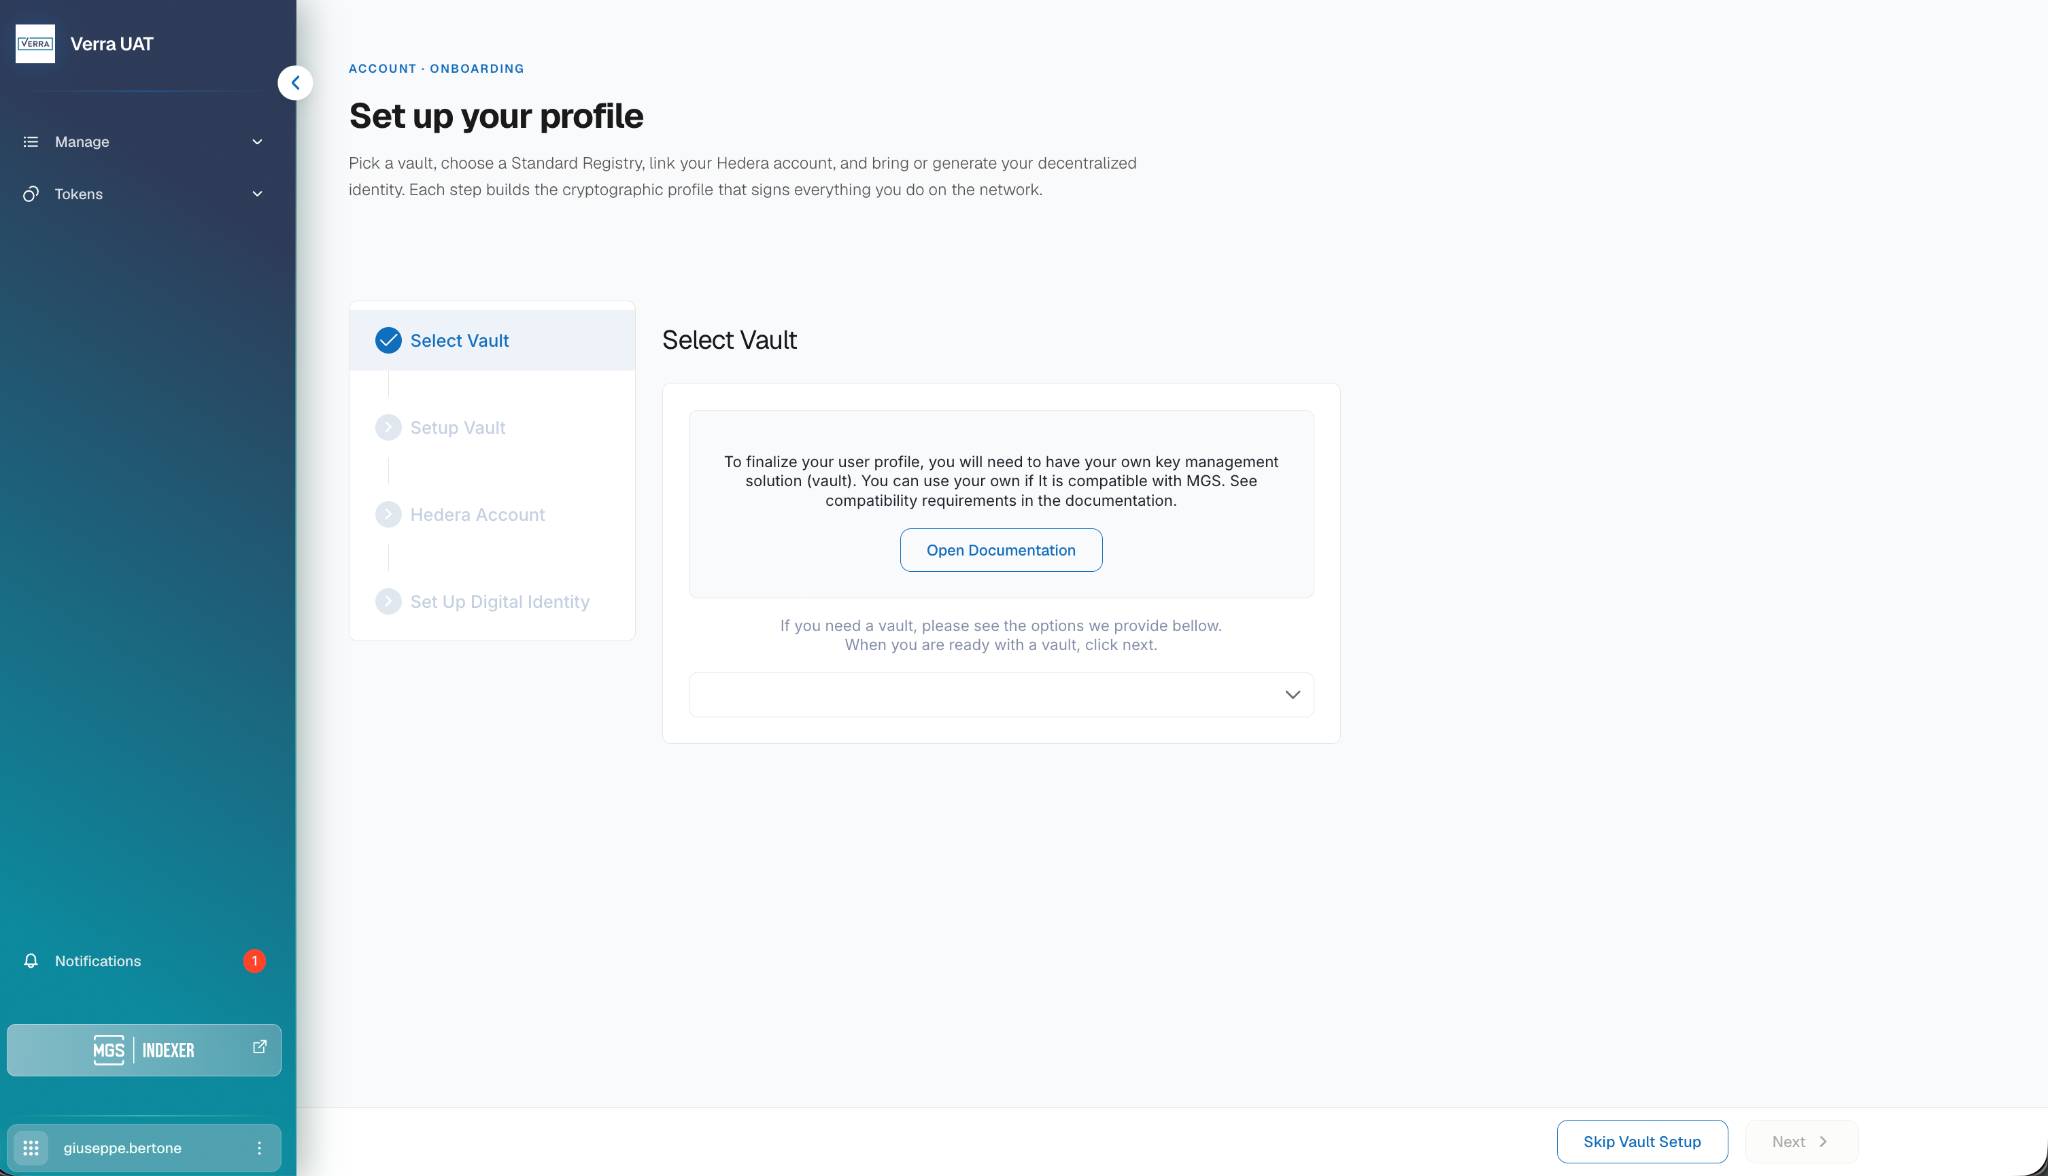 *Figure 8. User Profile Setup for the remote user.*
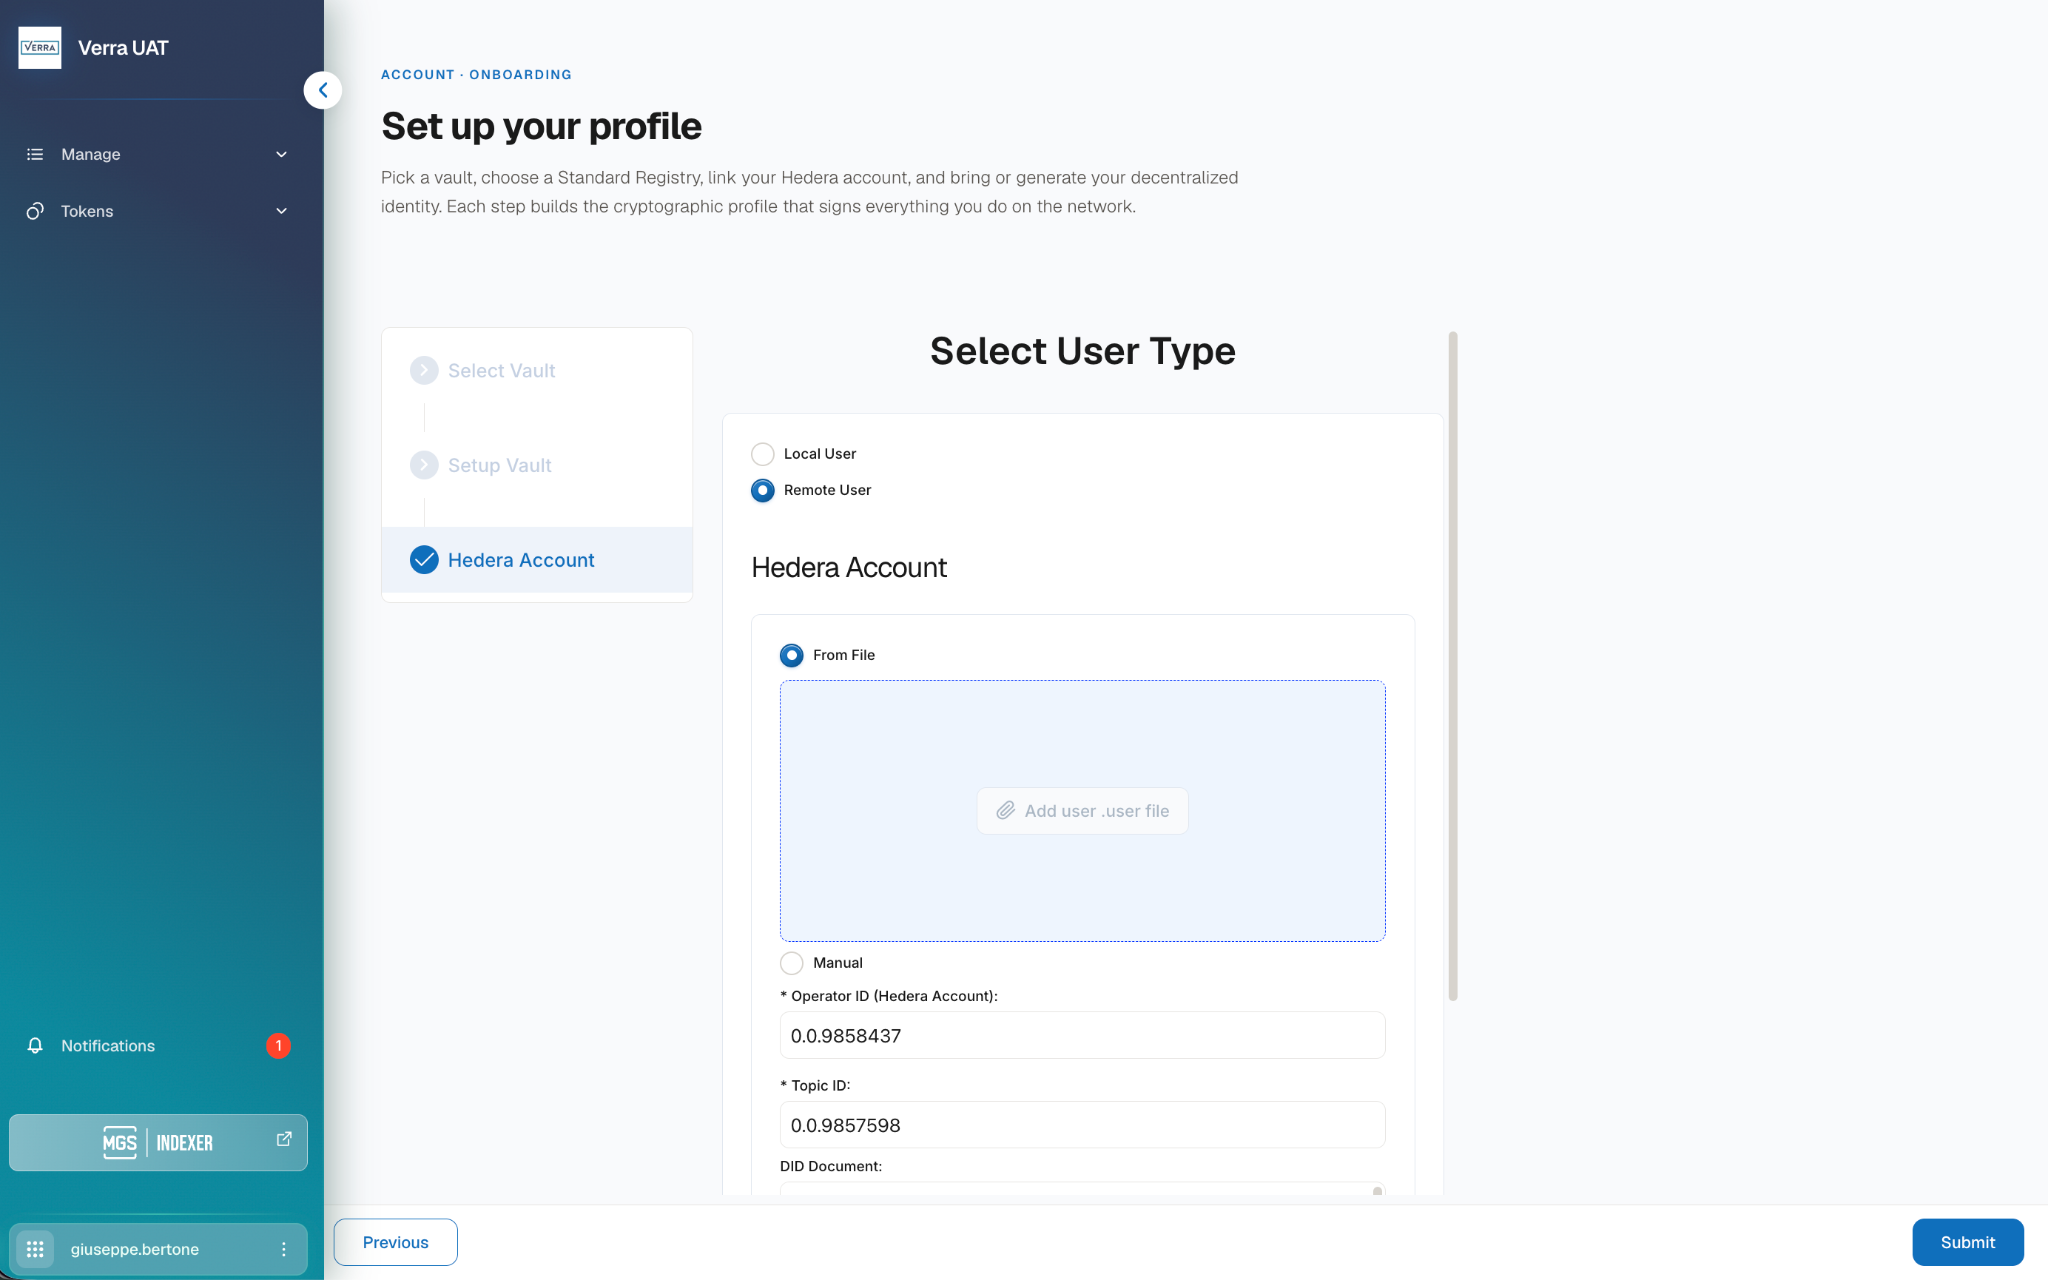 *Figure 9. Uploading the .user file fills in the Hedera credentials automatically.*
4. Click **Submit**. The remote user is created as a copy of the dependent user.
*Figure 9. Uploading the .user file fills in the Hedera credentials automatically.*
4. Click **Submit**. The remote user is created as a copy of the dependent user.
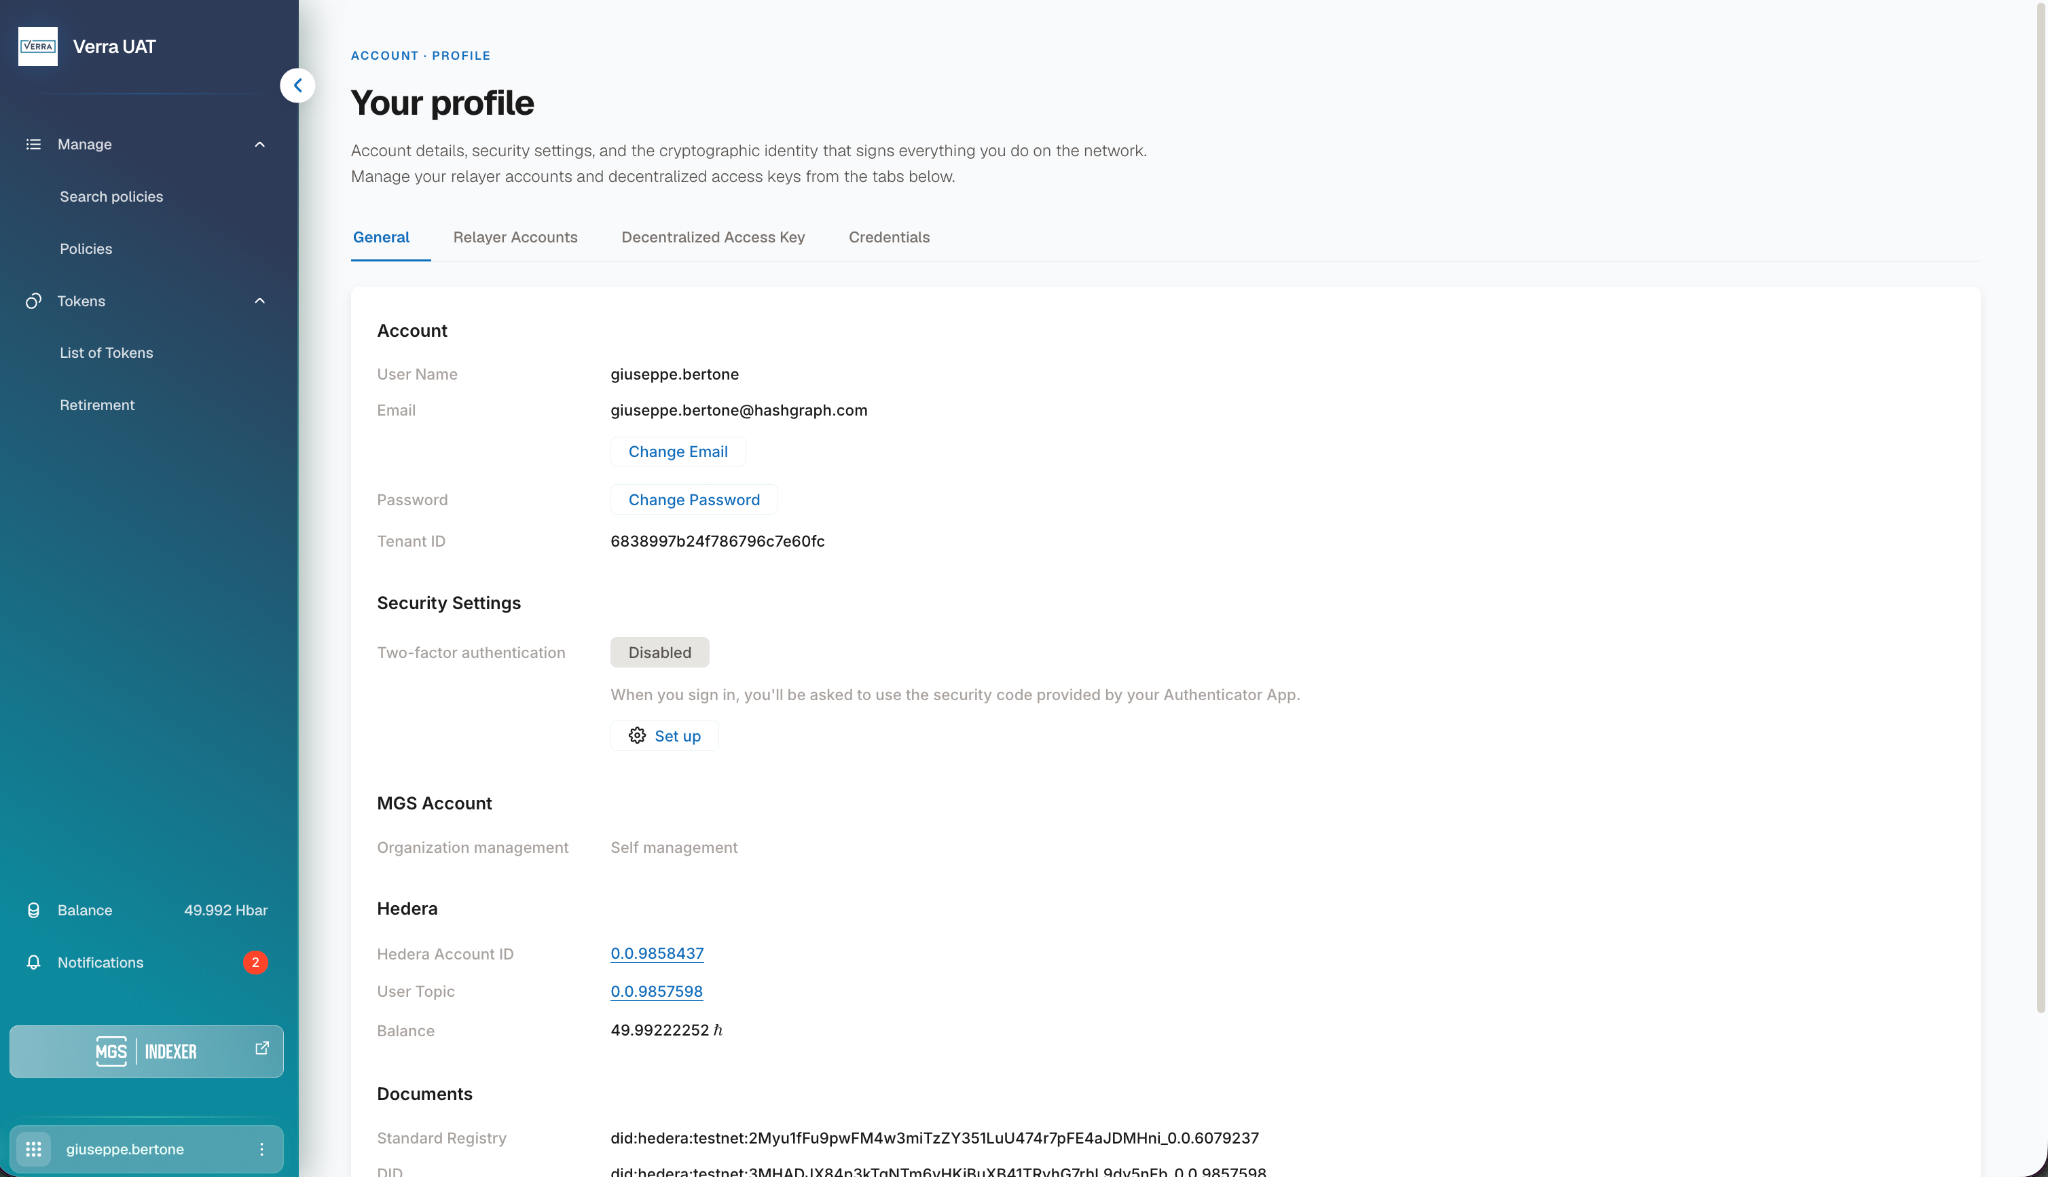 *Figure 10. Remote user created in the main instance.*
{% hint style="info" %}
Note: To confirm the remote user was created correctly, compare its profile with the dependent user's profile. The Hedera account ID, user topic, and DID should be identical.
{% endhint %}
### 8. Assign the remote user to the policy (Main instance)
1. Switch to the **main instance** and log in with **administrator access**.
2. Open the **user management** page and click the **user’s details**. Click **Assigned policies**, and add **VM0047** to the user’s policies.
### 9. Generate the decentralized access key (Dependent instance)
1. In the **dependent instance**, open the user's Profile page and switch to the **Decentralized Access Key** tab.
2. Click Generate Key.
3. Enter the **public link** value (from step 4.2, i.e., **1785511586.942929104**) and click **Generate** to generate a new key.
*Figure 10. Remote user created in the main instance.*
{% hint style="info" %}
Note: To confirm the remote user was created correctly, compare its profile with the dependent user's profile. The Hedera account ID, user topic, and DID should be identical.
{% endhint %}
### 8. Assign the remote user to the policy (Main instance)
1. Switch to the **main instance** and log in with **administrator access**.
2. Open the **user management** page and click the **user’s details**. Click **Assigned policies**, and add **VM0047** to the user’s policies.
### 9. Generate the decentralized access key (Dependent instance)
1. In the **dependent instance**, open the user's Profile page and switch to the **Decentralized Access Key** tab.
2. Click Generate Key.
3. Enter the **public link** value (from step 4.2, i.e., **1785511586.942929104**) and click **Generate** to generate a new key.
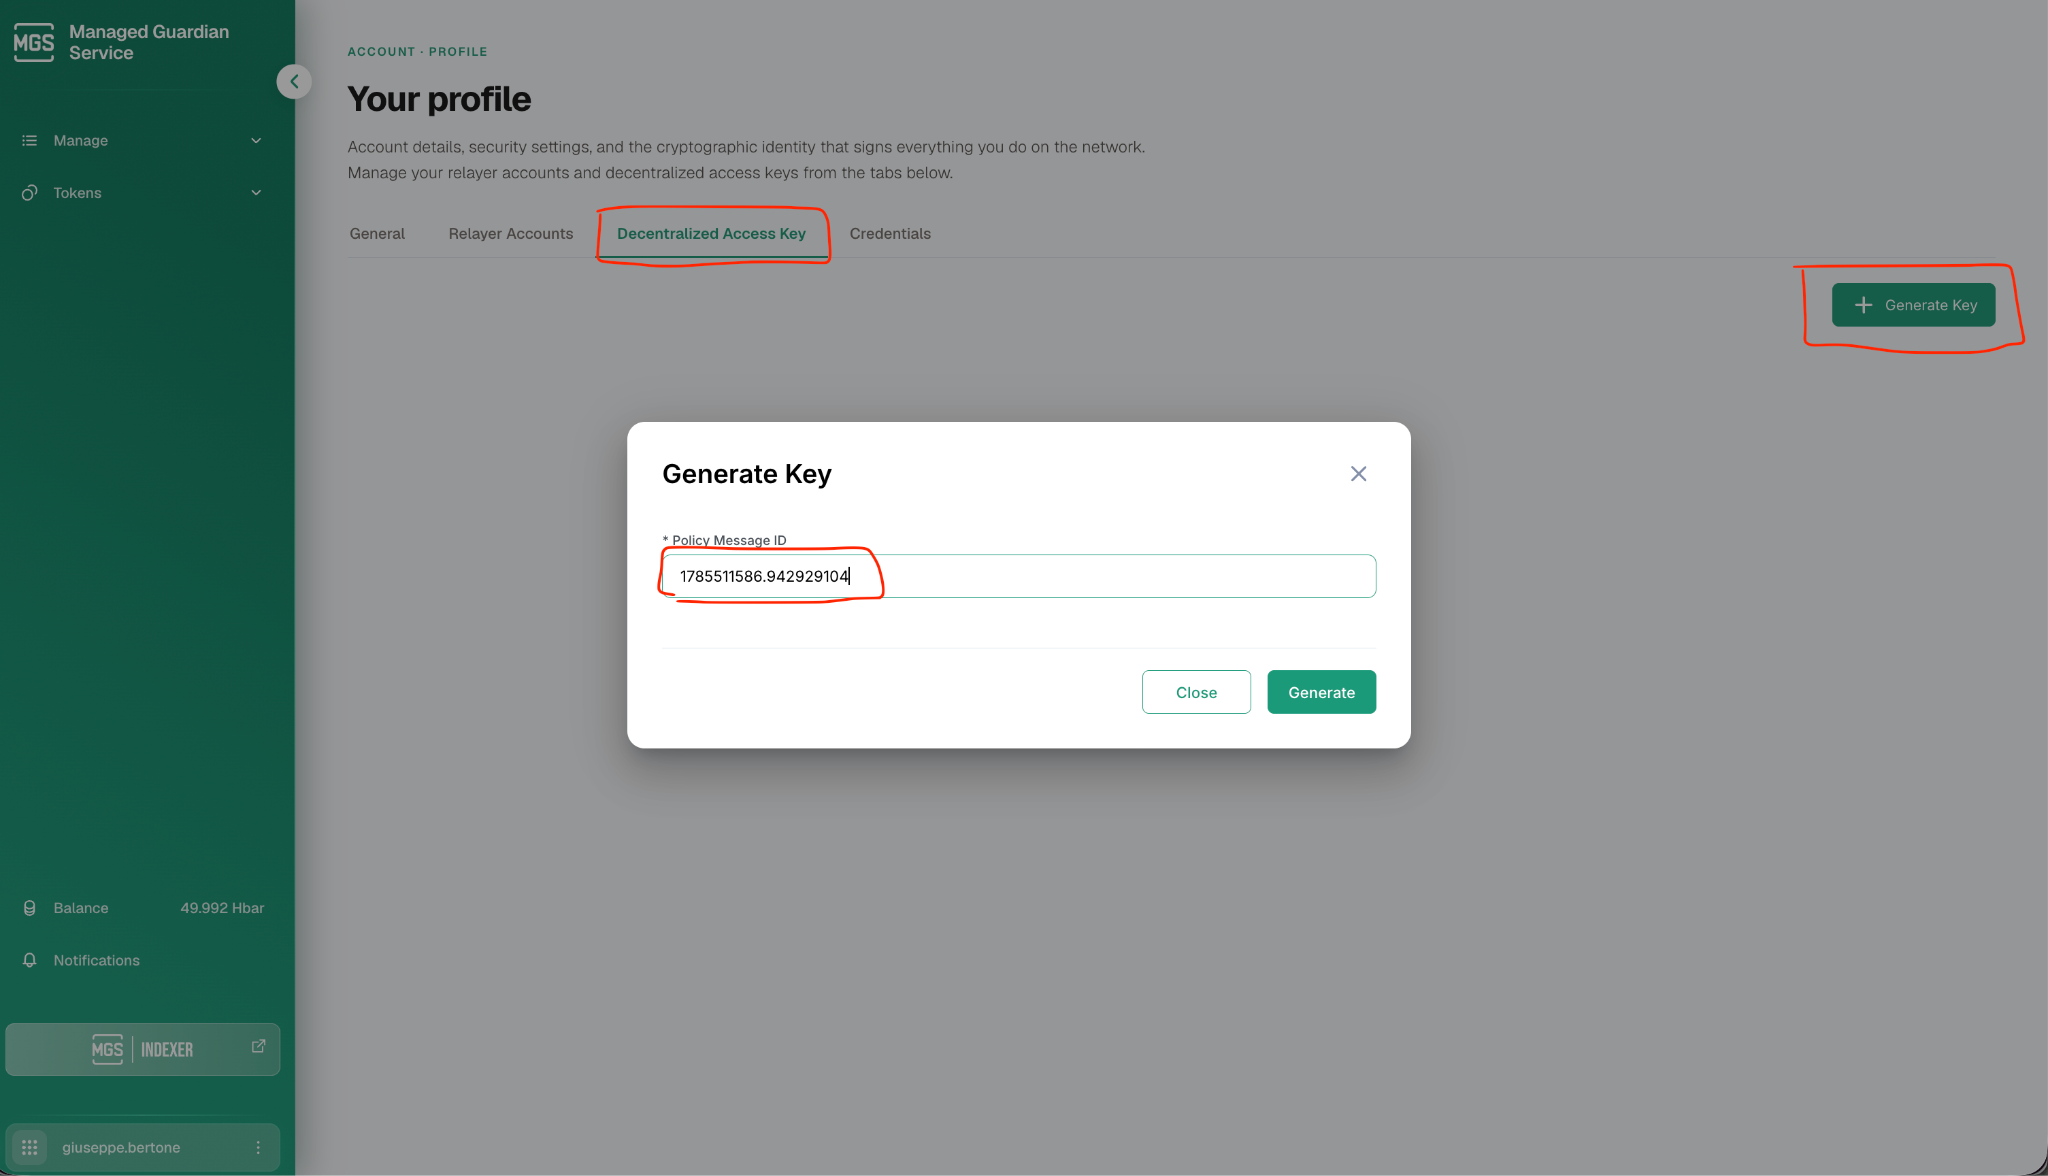 *Figure 11. Generate a decentralized access key for the public link.*
4\. **Copy the generated key** from the preview window and **save** it together with the public link. **You cannot recover the private key after the pop up window is closed**. Both are needed in the next steps.
*Figure 11. Generate a decentralized access key for the public link.*
4\. **Copy the generated key** from the preview window and **save** it together with the public link. **You cannot recover the private key after the pop up window is closed**. Both are needed in the next steps.
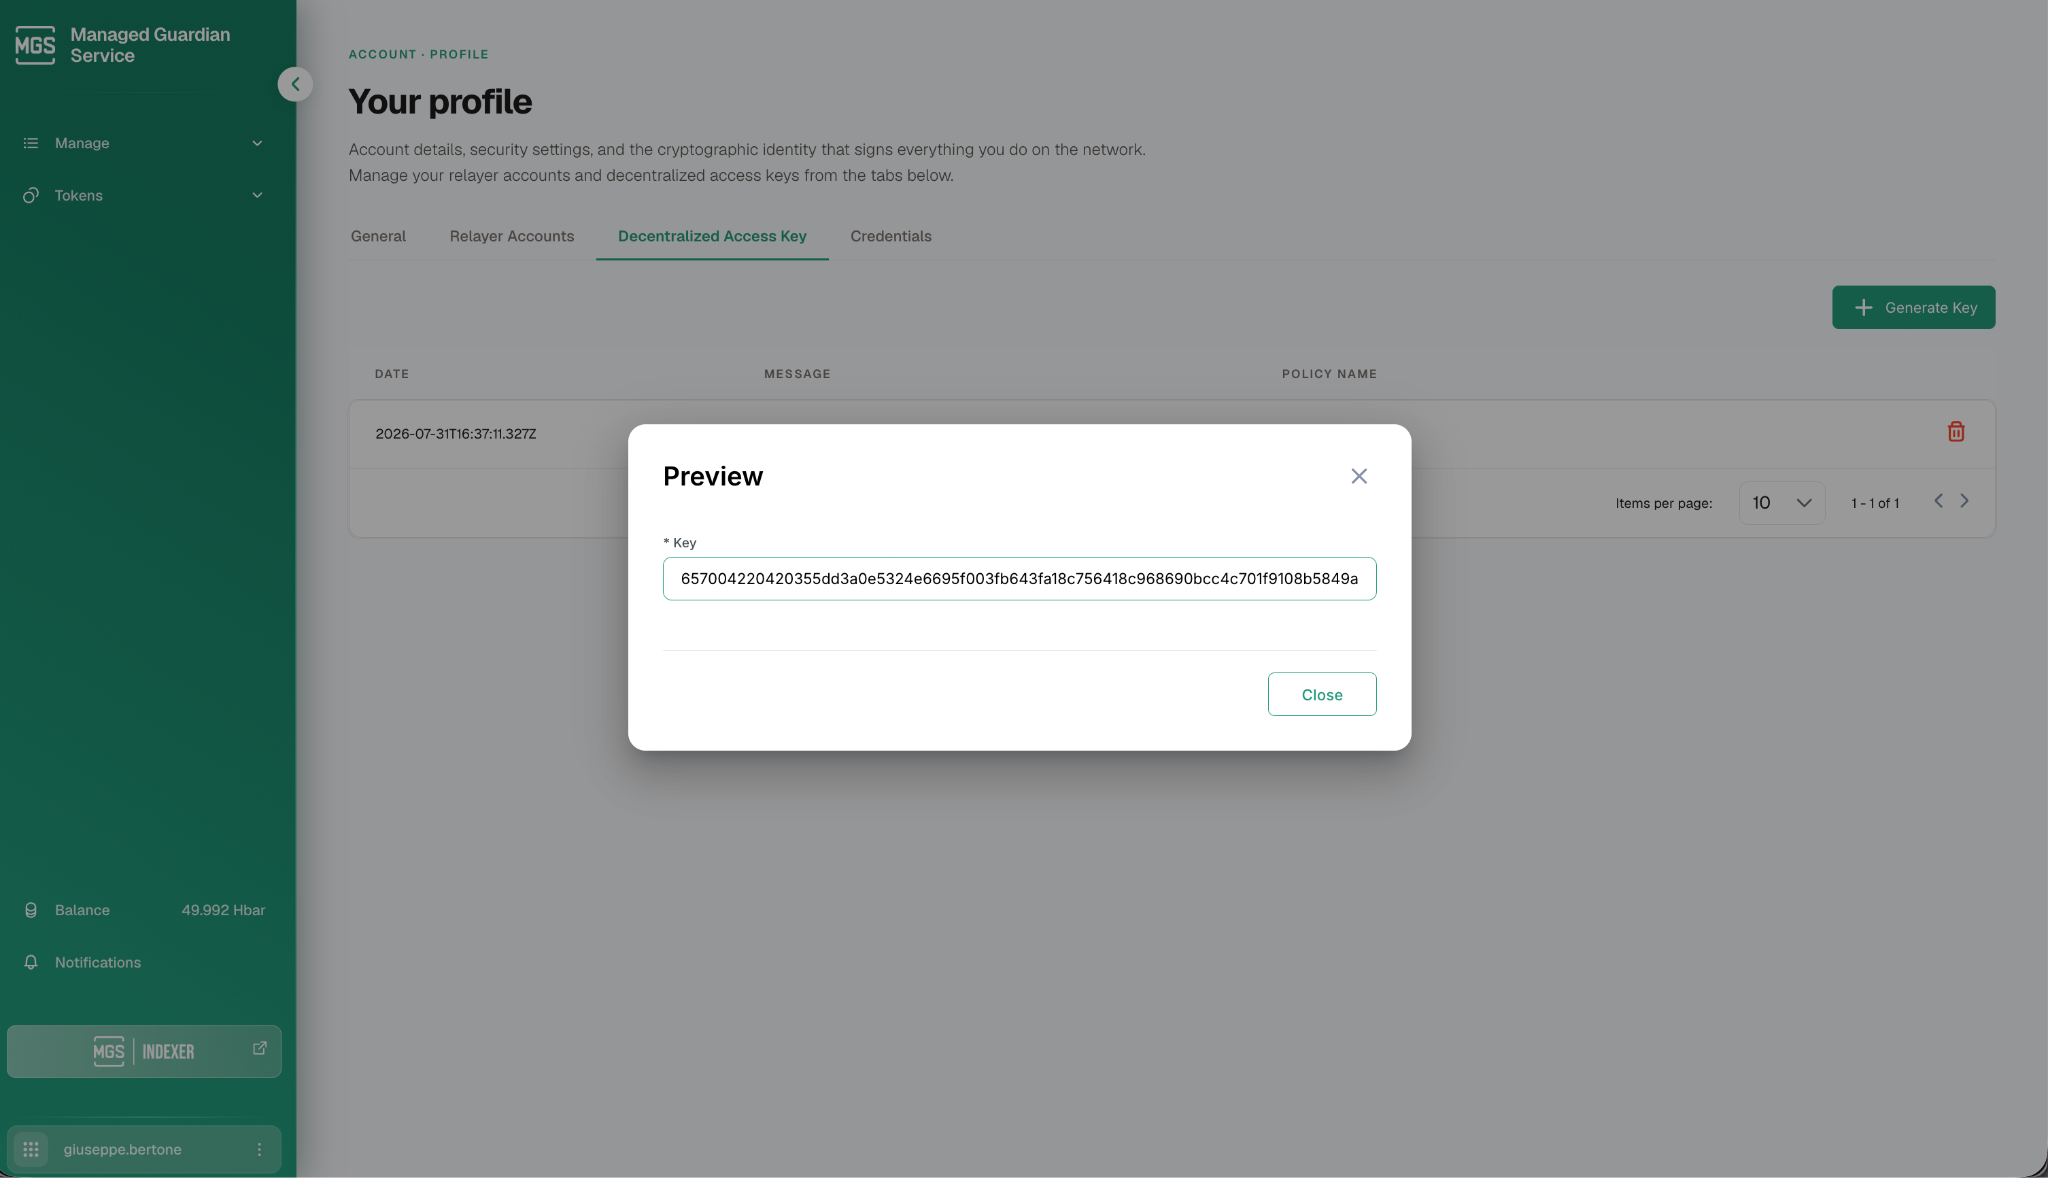 *Figure 12. Copy the generated key and store it locally.*
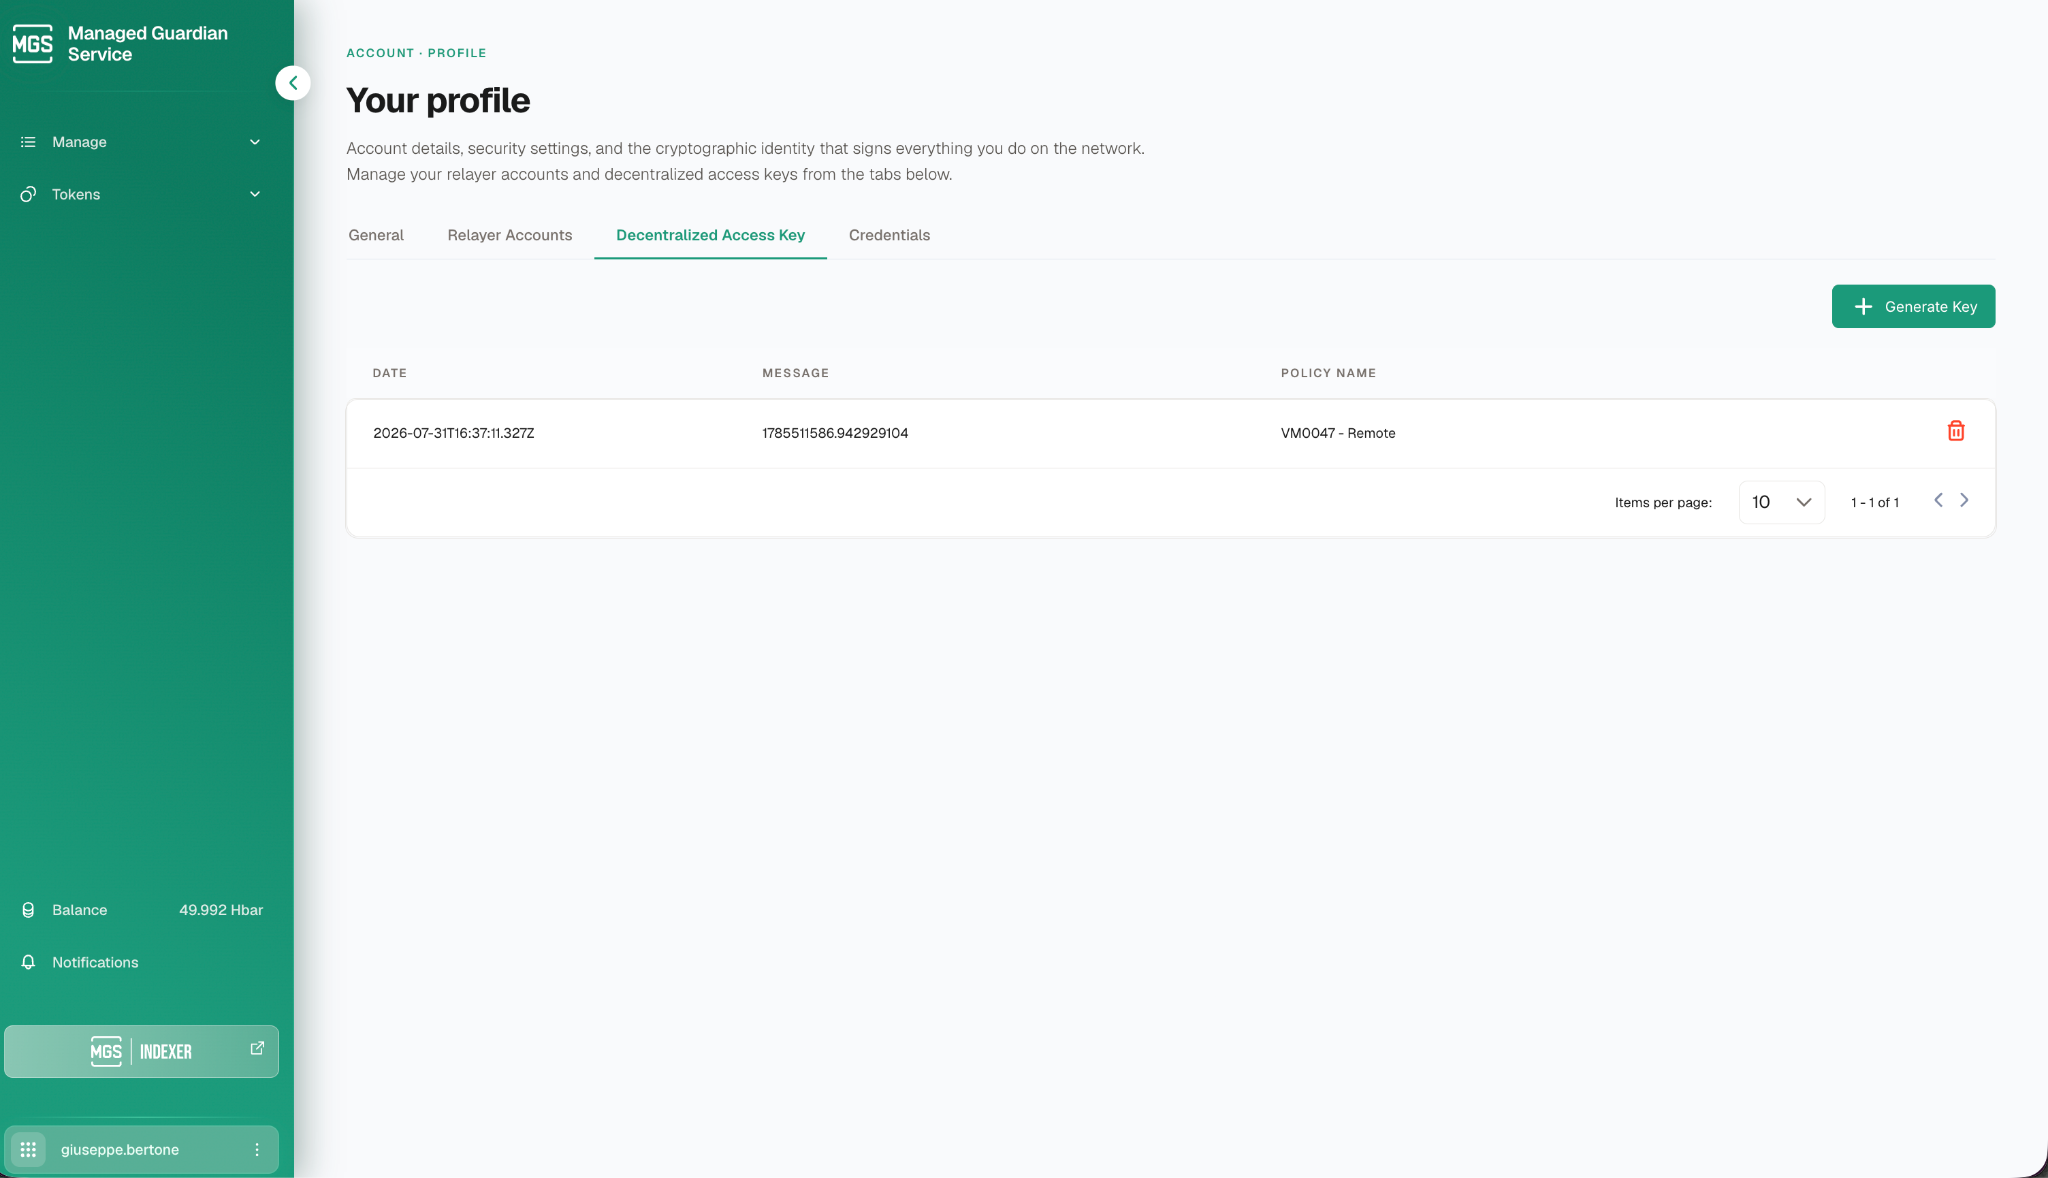 *Figure 13. The decentralized key is now saved in the Guardian.*
### 10. Import the key into the remote user’s detail (Dependent user using the main instance)
1. In the main instance, **log in as the remote user** created in [step 7](#id-7.-create-the-remote-user-dependent-user-using-the-main-instance).
2. Open **Profile**, then the **Decentralized Access Key** tab, and click **Import Key**.
3. Paste the **public link** and the **key**, then click **Import**.
4. The **imported key** is listed with its **date**, **public link**, and **policy name**. **The remote user now has full rights to submit projects to the policy.**
*Figure 13. The decentralized key is now saved in the Guardian.*
### 10. Import the key into the remote user’s detail (Dependent user using the main instance)
1. In the main instance, **log in as the remote user** created in [step 7](#id-7.-create-the-remote-user-dependent-user-using-the-main-instance).
2. Open **Profile**, then the **Decentralized Access Key** tab, and click **Import Key**.
3. Paste the **public link** and the **key**, then click **Import**.
4. The **imported key** is listed with its **date**, **public link**, and **policy name**. **The remote user now has full rights to submit projects to the policy.**
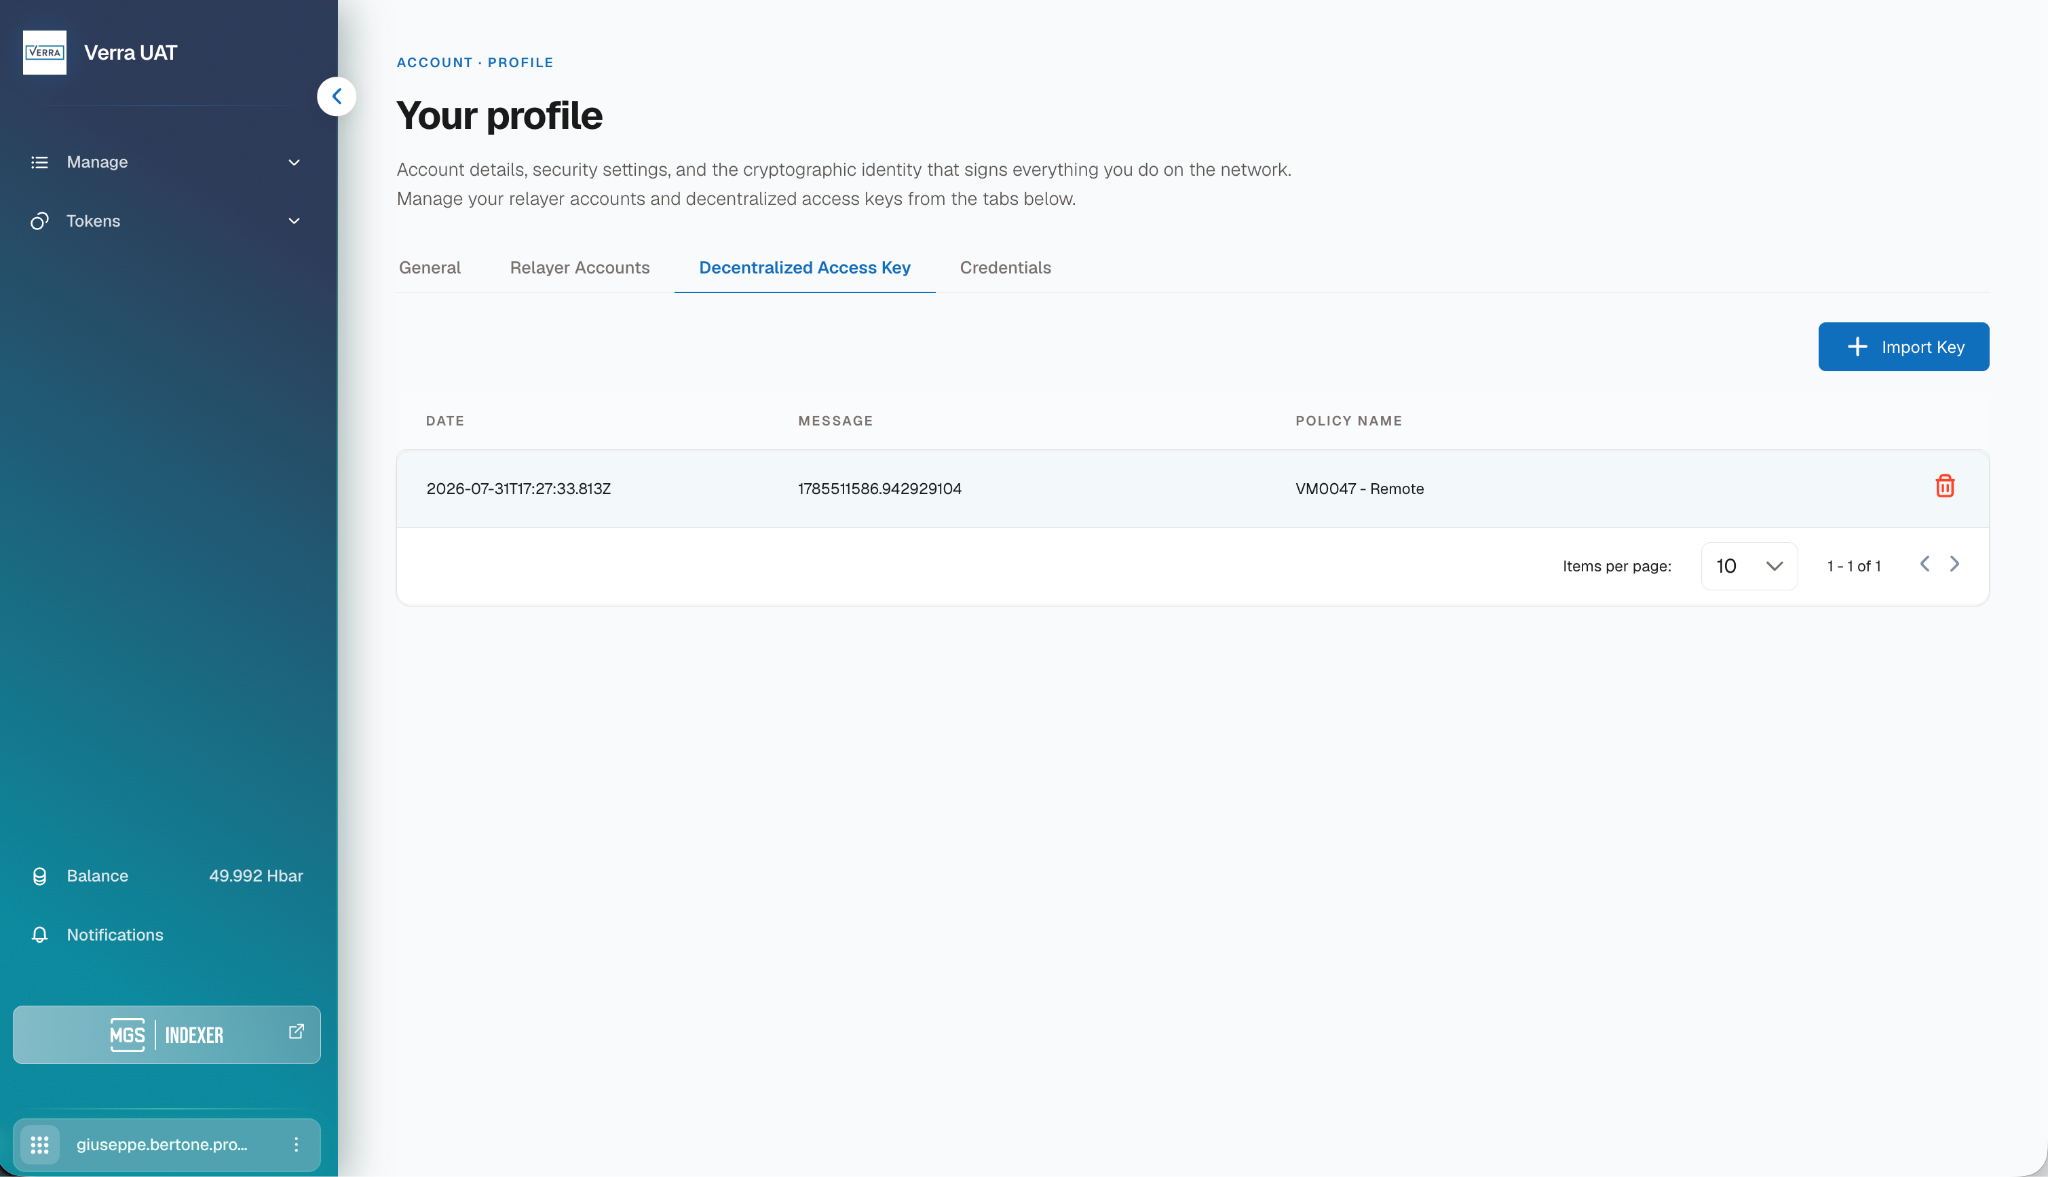 *Figure 14. The decentralized key is now imported in the remote user’s profile.*
### 11. Use the policy (Dependent instance)
1. In the **dependent instance**, login as a local user, go to the list of policies and open the **Remote Policies** tab. The approved policy now shows an **Open** button.
*Figure 14. The decentralized key is now imported in the remote user’s profile.*
### 11. Use the policy (Dependent instance)
1. In the **dependent instance**, login as a local user, go to the list of policies and open the **Remote Policies** tab. The approved policy now shows an **Open** button.
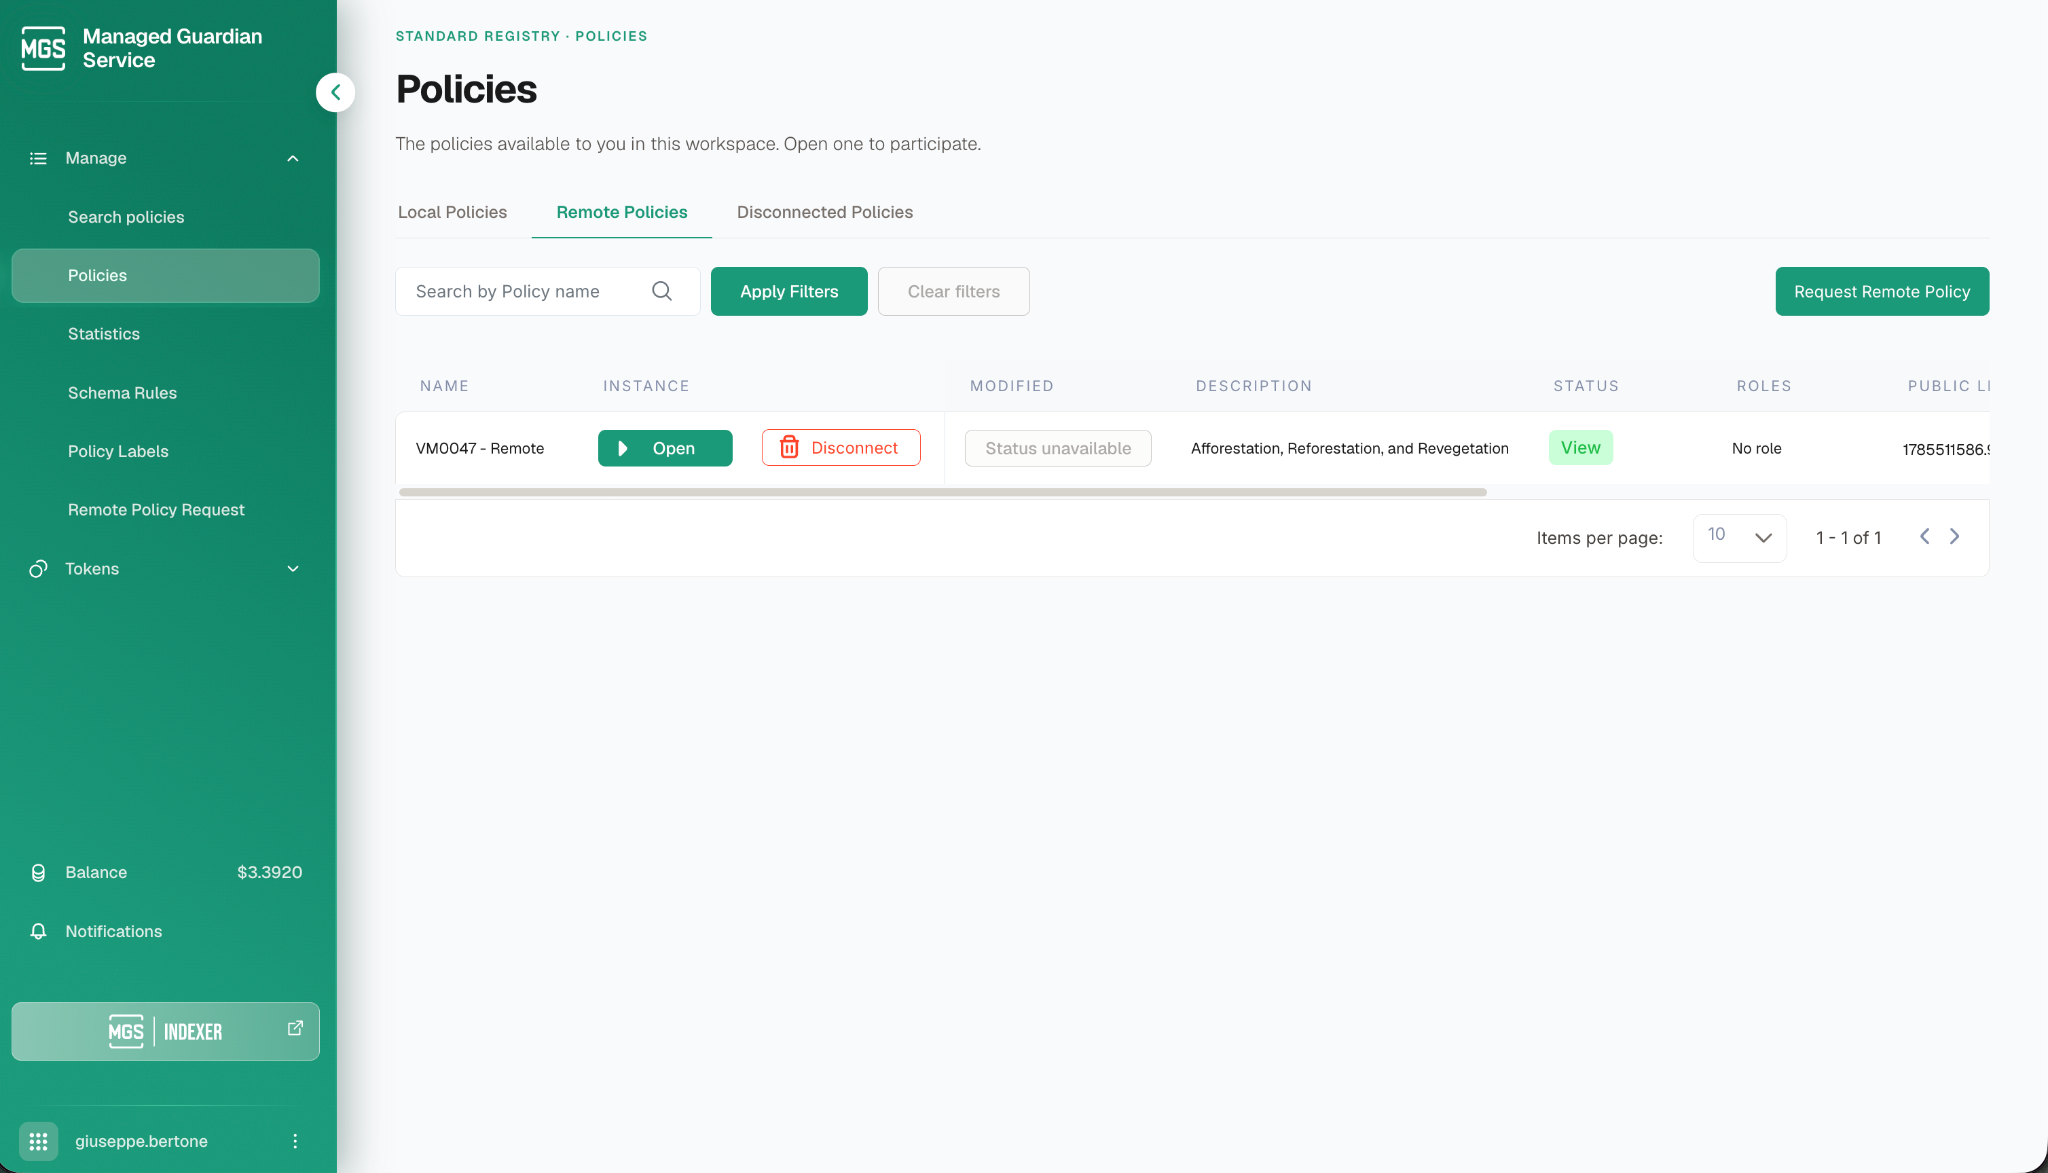 *Figure 15. The approved remote policy is ready for registration.*
2. Click **Open** to enter the policy.
3. **Choose your role** (i.e., Project Proponent).
*Figure 15. The approved remote policy is ready for registration.*
2. Click **Open** to enter the policy.
3. **Choose your role** (i.e., Project Proponent).
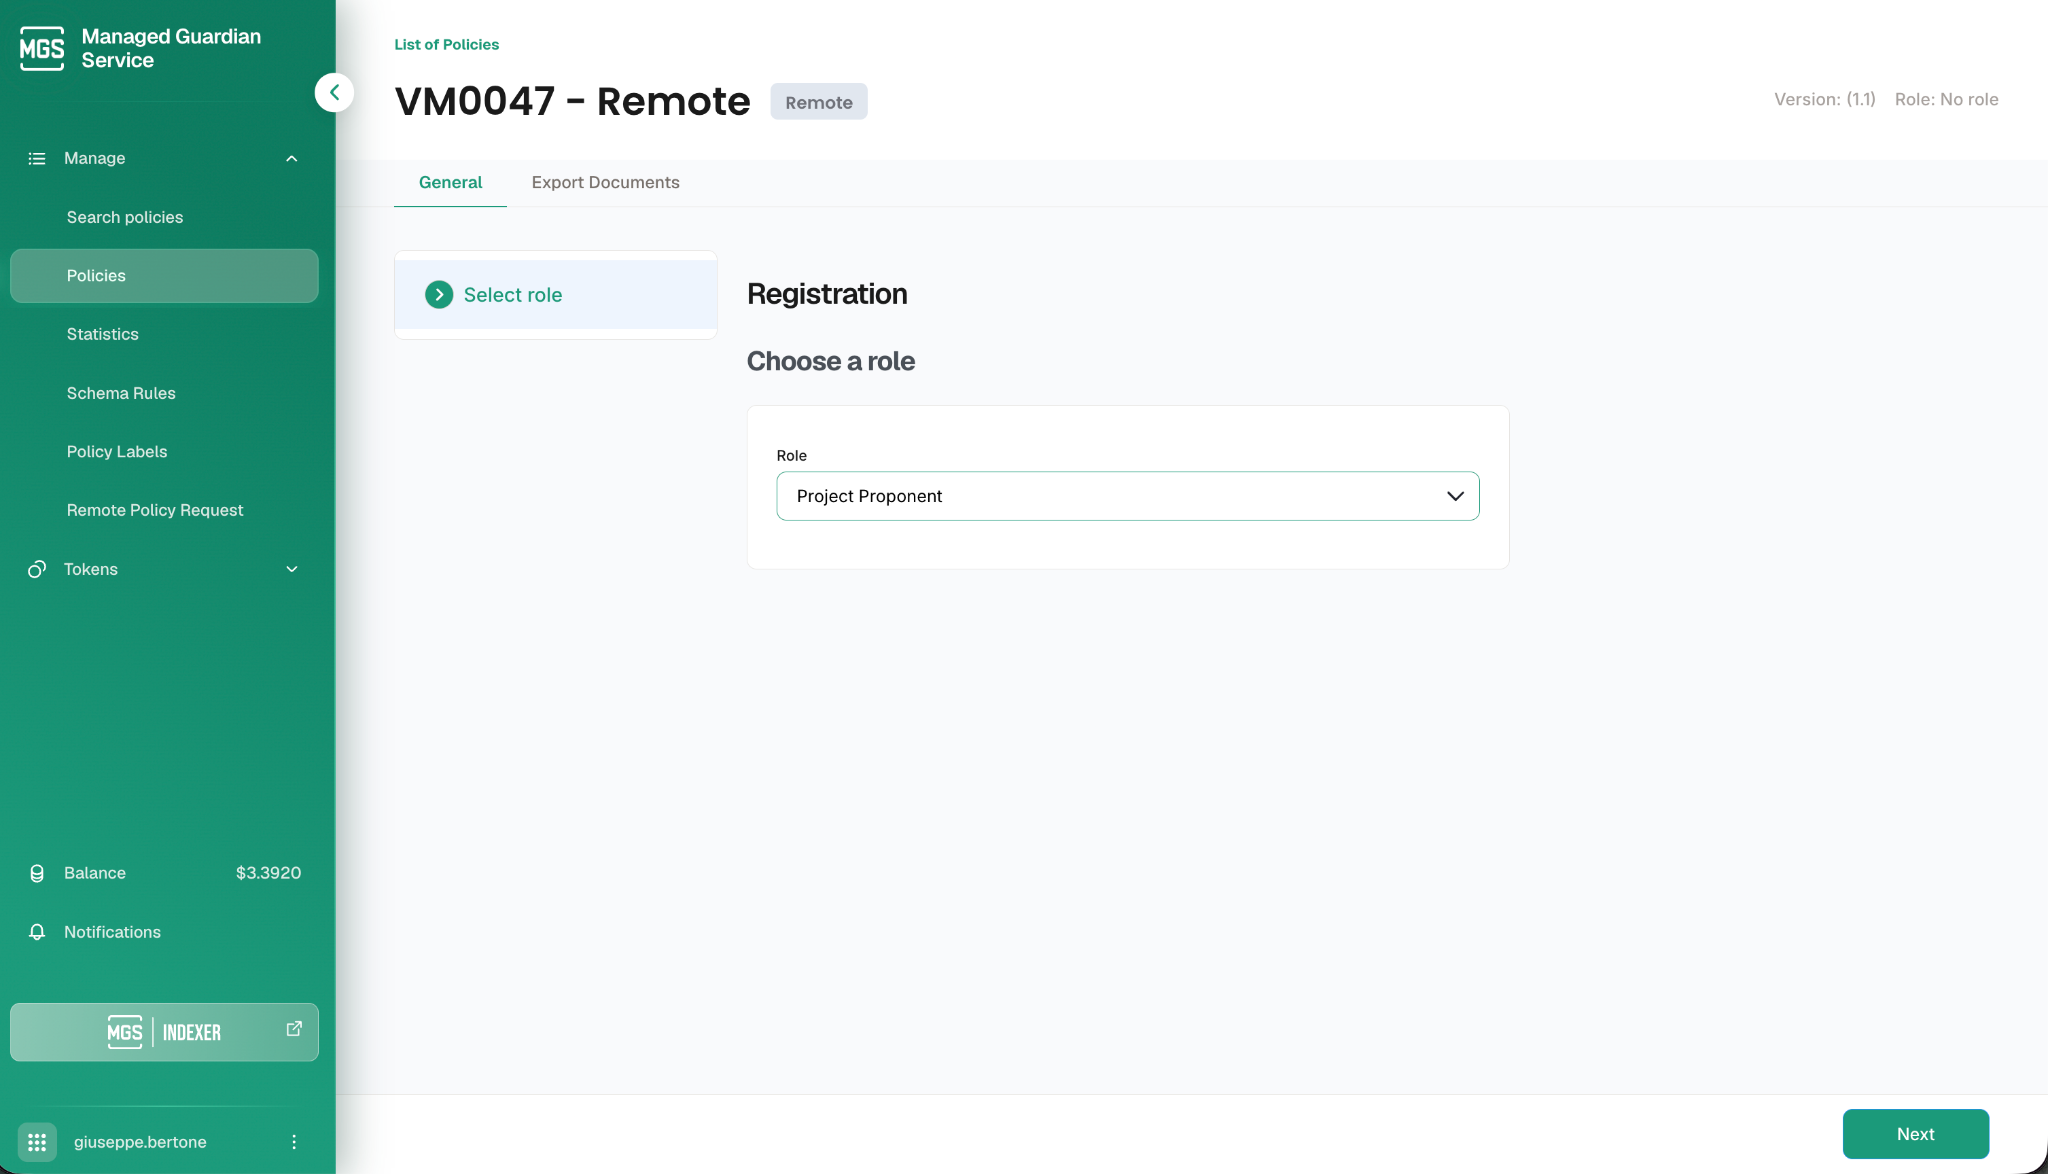 *Figure 16. Select a role in the policy, for example Project Proponent.*
4. A message appears: "You have new remote policy actions. Wait for the event to be processed." Wait for the action to synchronize with the main instance before being able to approve the request.
*Figure 16. Select a role in the policy, for example Project Proponent.*
4. A message appears: "You have new remote policy actions. Wait for the event to be processed." Wait for the action to synchronize with the main instance before being able to approve the request.
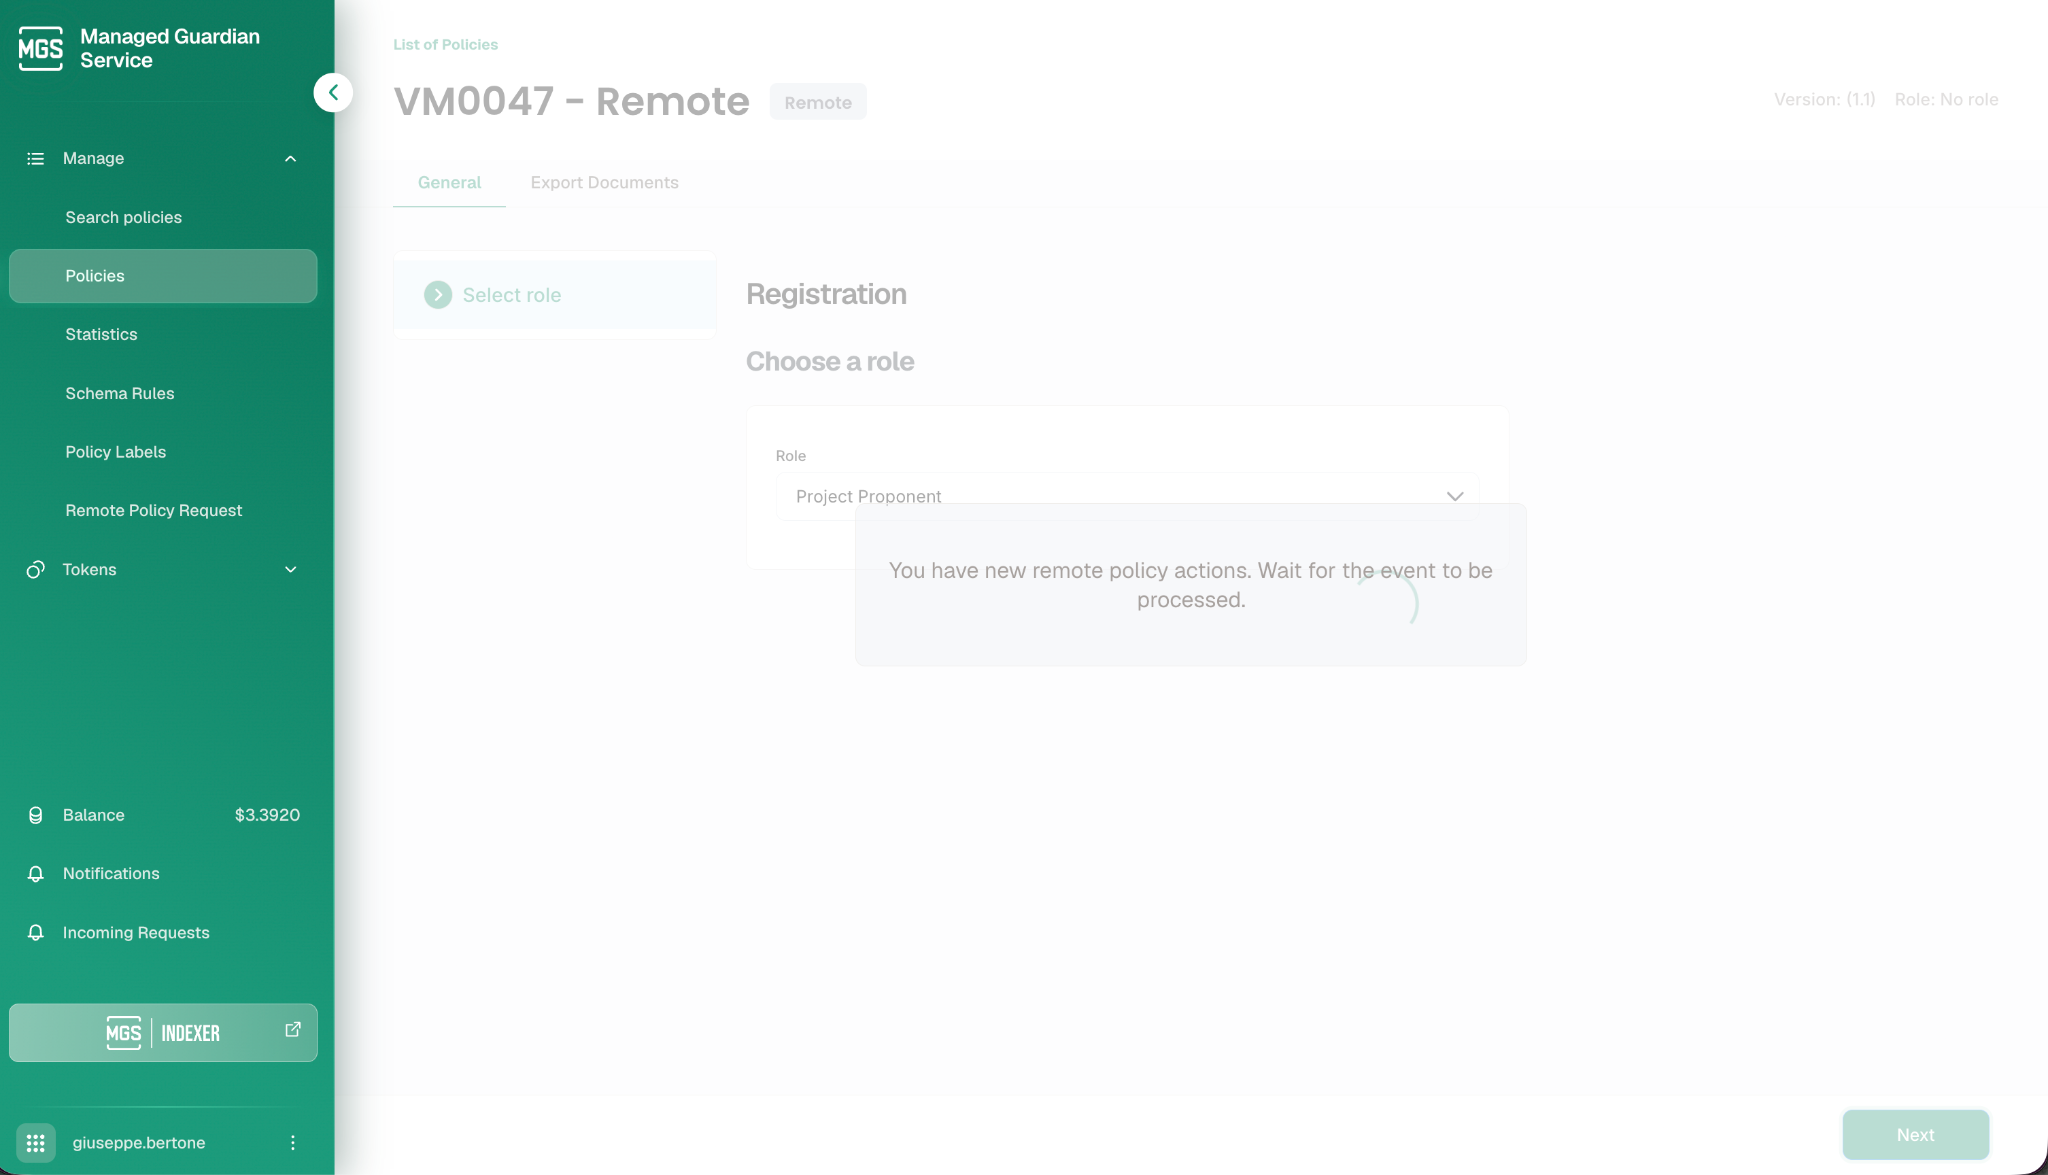 *Figure 17. Actions in a remote policy need a short processing time before they can be approved.*
### 12. Approve the request (Dependent instance)
1. Open **Incoming Requests** from the side menu. A badge shows the number of pending requests.
2. The **role selection** appears as a request with the operation type **Select role**. Click **Approve**.
3. Wait for the request to finish processing. Once completed, you can go back to the policy.
*Figure 17. Actions in a remote policy need a short processing time before they can be approved.*
### 12. Approve the request (Dependent instance)
1. Open **Incoming Requests** from the side menu. A badge shows the number of pending requests.
2. The **role selection** appears as a request with the operation type **Select role**. Click **Approve**.
3. Wait for the request to finish processing. Once completed, you can go back to the policy.
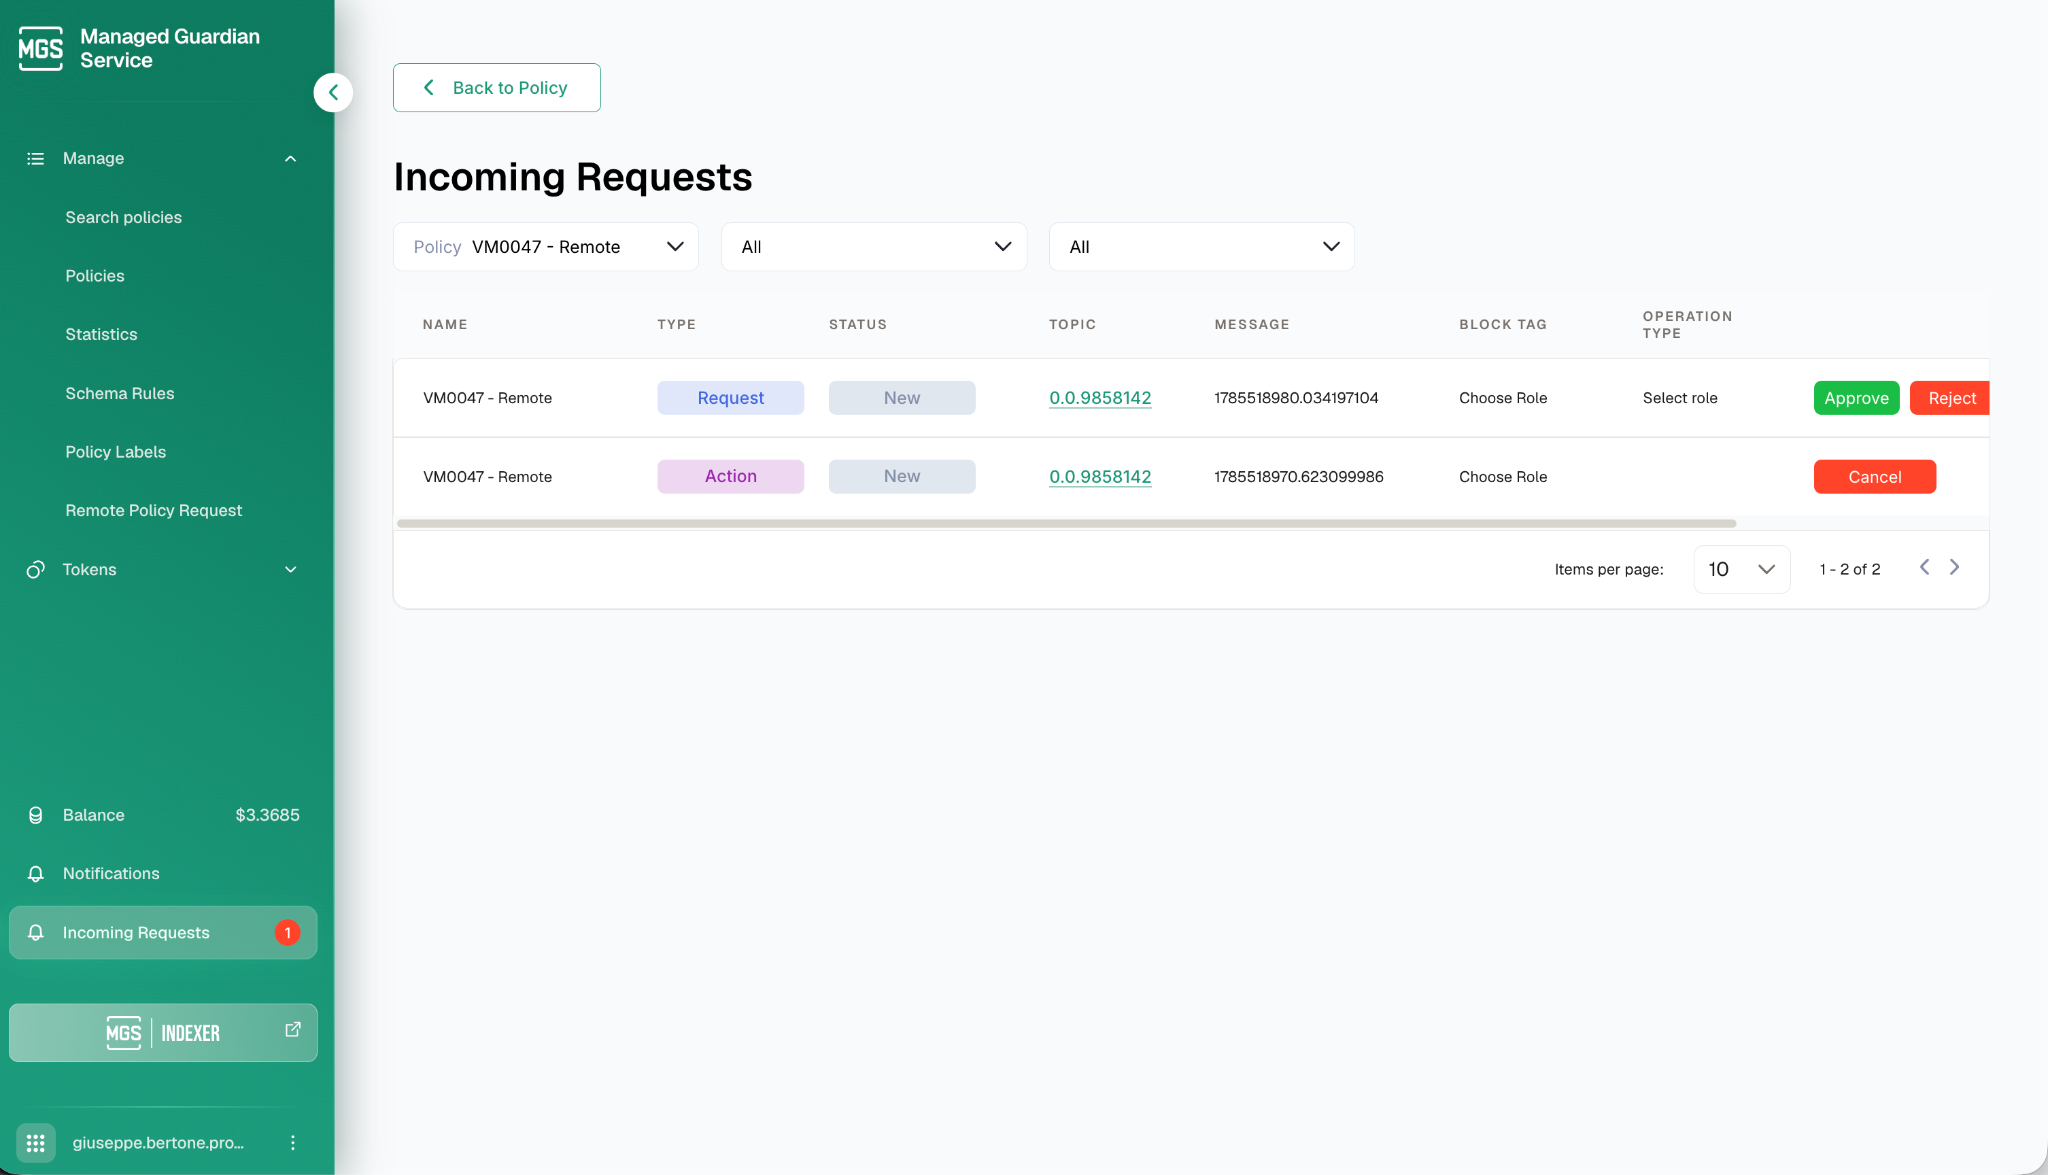 *Figure 18. Approve the Select role request on the Incoming Requests screen.*
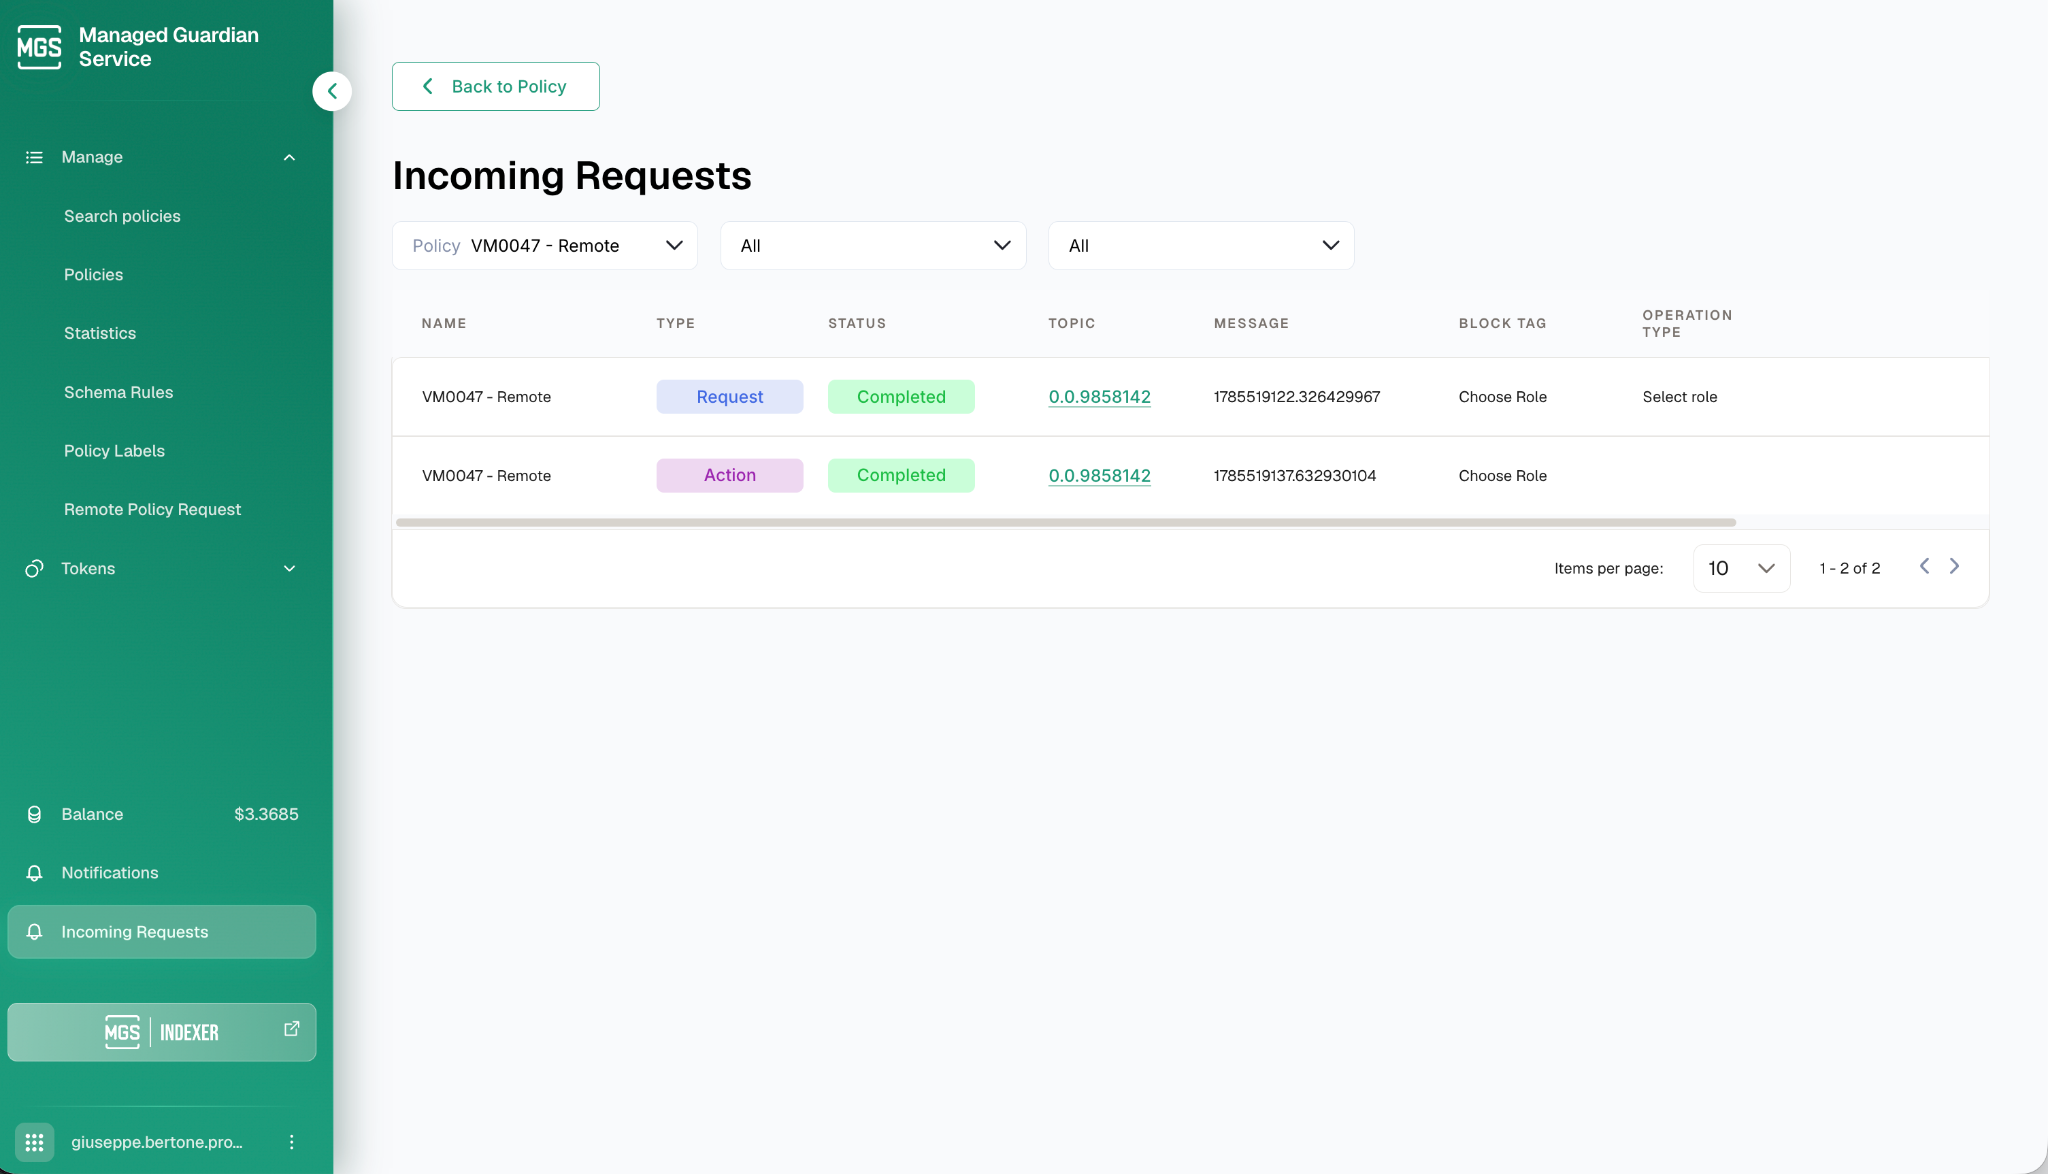 *Figure 19. The request to operate has been approved.*
### 13. Submit a project (Dependent instance)
1. Return to the policy through the **Remote Policies** tab. Once the role approval has been processed, the **New project** button appears.
2. Click **New project** and complete the project details form. You can fill the form manually, upload prepared data from a json file, or submit through the API.
3. Submit the project.
### 14. Approve the remaining policy requests (Dependent instance)
1. After submitting, new entries appear under **Incoming Requests**. Each one corresponds to a block configured in the policy workflow. The **user must approve every request** before this can be executed locally and remotely.
2. Approve each request and wait for its status to change to **Completed**.
### 15. Confirm the submission (Main instance)
1. Go back to the main instance, log in as the standard registry, open the local policy, and open the **Projects** view.
2. The submitted project appears in the grid.
From this point the workflow continues exactly as the policy defines it: monitoring reports, validation and verification, and token issuance, with each decentralized action passing through the **Incoming Requests** queue described above.
---
# Agent Instructions
This documentation is published with GitBook. GitBook is the documentation platform designed so that both humans and AI agents can read, navigate, and reason over technical content effectively. Learn more at gitbook.com.
## Querying This Documentation
If you need additional information that is not directly available in this page, you can query the documentation dynamically by asking a question.
Perform an HTTP GET request on the current page URL with the `ask` query parameter, and the optional `goal` query parameter:
```
GET https://guardian.hedera.com/guardian/workspace/decentralized-guardian/connecting-your-mgs-instance-with-verra/step-by-step-walkthrough.md?ask=&goal=
```
`ask` is the immediate question: it should be specific, self-contained, and written in natural language.
`goal` is optional and describes the broader end goal you are ultimately trying to accomplish on behalf of the user. GitBook uses it to tailor the answer towards what is most useful for that goal.
The response will contain a direct answer to the question and relevant excerpts and sources from the documentation.
Use this mechanism when the answer is not explicitly present in the current page, you need clarification or additional context, or you want to retrieve related documentation sections.
*Figure 19. The request to operate has been approved.*
### 13. Submit a project (Dependent instance)
1. Return to the policy through the **Remote Policies** tab. Once the role approval has been processed, the **New project** button appears.
2. Click **New project** and complete the project details form. You can fill the form manually, upload prepared data from a json file, or submit through the API.
3. Submit the project.
### 14. Approve the remaining policy requests (Dependent instance)
1. After submitting, new entries appear under **Incoming Requests**. Each one corresponds to a block configured in the policy workflow. The **user must approve every request** before this can be executed locally and remotely.
2. Approve each request and wait for its status to change to **Completed**.
### 15. Confirm the submission (Main instance)
1. Go back to the main instance, log in as the standard registry, open the local policy, and open the **Projects** view.
2. The submitted project appears in the grid.
From this point the workflow continues exactly as the policy defines it: monitoring reports, validation and verification, and token issuance, with each decentralized action passing through the **Incoming Requests** queue described above.
---
# Agent Instructions
This documentation is published with GitBook. GitBook is the documentation platform designed so that both humans and AI agents can read, navigate, and reason over technical content effectively. Learn more at gitbook.com.
## Querying This Documentation
If you need additional information that is not directly available in this page, you can query the documentation dynamically by asking a question.
Perform an HTTP GET request on the current page URL with the `ask` query parameter, and the optional `goal` query parameter:
```
GET https://guardian.hedera.com/guardian/workspace/decentralized-guardian/connecting-your-mgs-instance-with-verra/step-by-step-walkthrough.md?ask=&goal=
```
`ask` is the immediate question: it should be specific, self-contained, and written in natural language.
`goal` is optional and describes the broader end goal you are ultimately trying to accomplish on behalf of the user. GitBook uses it to tailor the answer towards what is most useful for that goal.
The response will contain a direct answer to the question and relevant excerpts and sources from the documentation.
Use this mechanism when the answer is not explicitly present in the current page, you need clarification or additional context, or you want to retrieve related documentation sections.